Hello friends, and welcome to Obsidian Soft,
Today, I will teach you how to make an easy but impressive app using MIT App Inventor: a diary app with pictures. In the process of making this app, you will learn some useful things:
1. How to use a date picker,
2. How to use an image picker,
and best of all,
3. How to show images in list view.
So, let’s begin:
Open up MIT App Inventor and start a new project. Let’s call it DiaryWithPicsApp. Keep the toolkit default. This is very important.
In the screen1’s properties, make align horizontal center. Also, make the screen orientation portrait and turn on the scrollable checkbox.
Add a Horizontal Arrangement from the Layout palette. Make align horizontal and align vertical both center. Make height 15% and width fill parent. Select the arrangement and duplicate it by pressing Ctrl + C & Ctrl + V on the keyboard for Windows OR Command + C & Command + V for MacOS. Duplicate again as we need 3 arrangements.
In the topmost arrangement, drag and drop a TextBox from the User Interface palette. Rename it to dateTxt and make it read-only.
On its right, drag and drop a DatePicker from the User Interface palette. Change text to “Choose Date”.
Now, drag and drop a TextBox between the 1st and 2nd horizontal arrangement. Rename to entryTxt. Make height 15% and width 90%.
Change hint to “Enter diary entry”.
Below this, drag and drop an Image component from the User Interface palette.
In the second horizontal arrangement, drag and drop a Button from the User Interface palette. Rename to cameraBtn and change text to “Camera”. Duplicate the button and rename to saveBtn. Change text to Save. Now, drag and drop an ImagePicker from the Media palette between these two buttons. Change text to “Choose Pic”.
Drag and drop a listview below this horizontal arrangement. Make width fill parent. Change ListViewLayout to Image and MainText. And turn on the checkbox for ShowFilterBar.
Drag and drop a button inside the last horizontal arrangement. Rename to viewBtn and change text to “View”. Duplicate this button. Rename to deleteBtn and change text to “Delete”. From the Storage palette, drag and drop a TinyDB component onto the viewer. From Sensors, drag and drop a Clock component. Add a Notifier from the User Interface palette and a Camera component from the Media palette.
Now, click on the “Add Screen” button and add another screen. Make the screen orientation portrait and align horizontal center. Add an image component, two labels, and one button. Rename the top label to dateLbl and the bottom label to entryLbl. Rename button to backBtn.
Our UX design is done, so let’s go to the blocks section. We will work on screen 1 first.
We need a global variable for our list of diary entries.

Get the screen1’s initialize event and set the data picker to the current date, and then update the date textbox with this date. This is done so that the user doesn’t have to choose today’s date. It is prefilled for him.
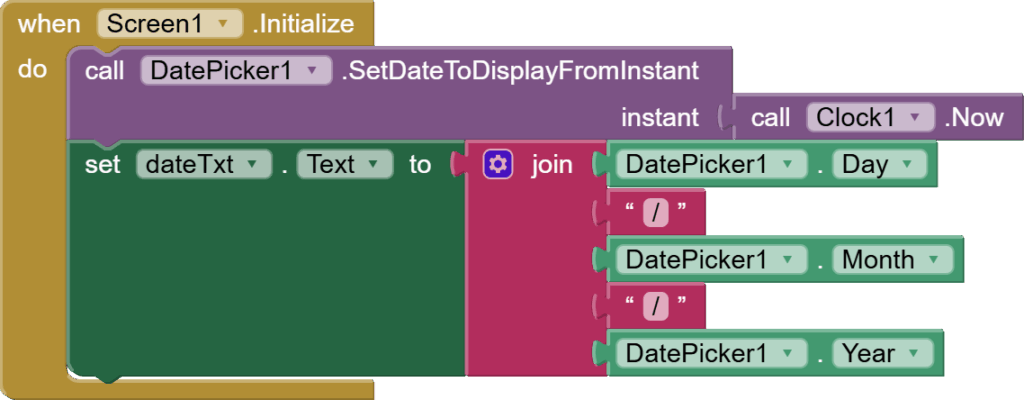
The initialize event is still not complete as we still need to load data here, but let’s work on saving first.
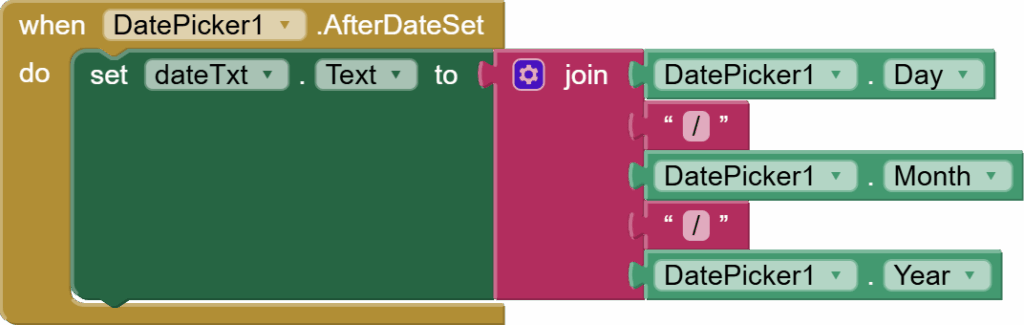
If the user clicks on a DatePicker to choose a date, then after picking the date, DatePicker’s AfterDateSet event is triggered. Get this event and just duplicate the dateTxt setting from the initialize event into this event too.
If the user clicks on the image picker and chooses a pic, AfterPicking event is triggered for the ImagePicker component.
Get it, and the code is simple here. Just set the image component’s picture to the image picker. Selection. This selection is a path to the chosen picture.

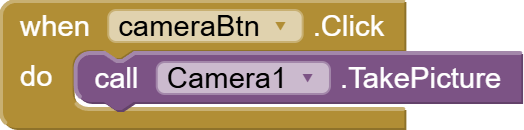
When the camera button is clicked, call TakePicture procedure for the camera component.
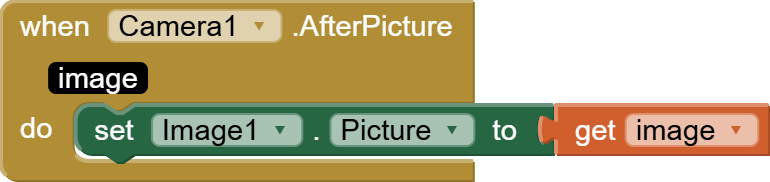
The after picture event is triggered for the camera once a picture has been taken. Just set the image component’s picture to the image. The image here is a path, too.
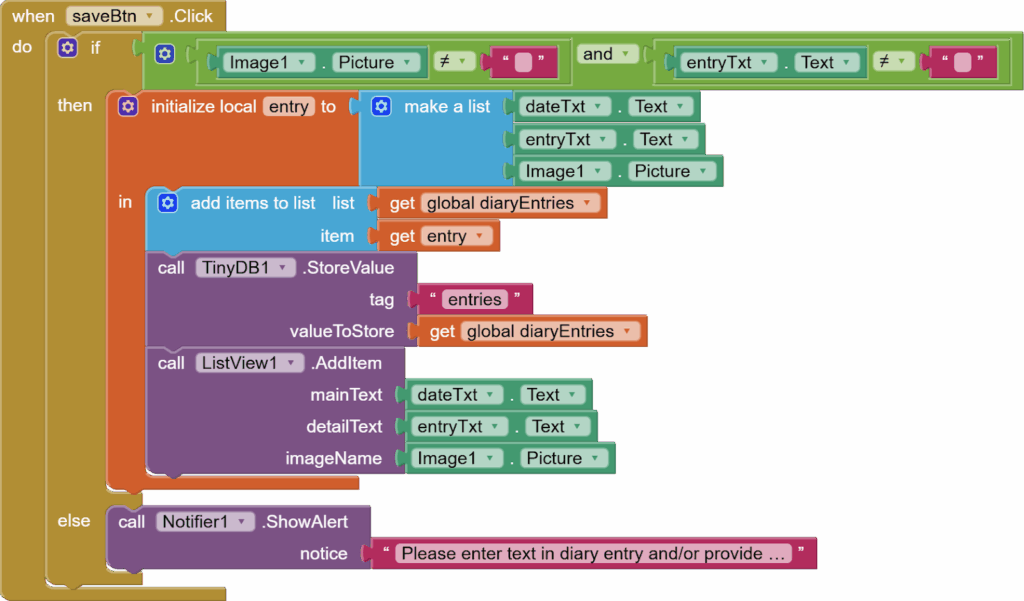
Now, get the save button click event.
First, check using the Control’s if/else block that image. picture isn’t empty, and the user has entered some text in our entry textbox. Inside the else block, use the notifier to show an alert and a relevant message.
Then, make a local variable entry for constructing our list of three items in this order:
- Text inside our readonly dateTxt.
- Text inside the entry textbox
- Image component’s picture
Add this local entry list to our global list of diaryEntries. Store this global list of diaryEntries in TinyDB against a tag such as “entries”.
And most importantly, add an item to your listview where mainTxt
=date, detailTxt= user entered diary entry, and imageName is the picture in our image component(remember it is a path)
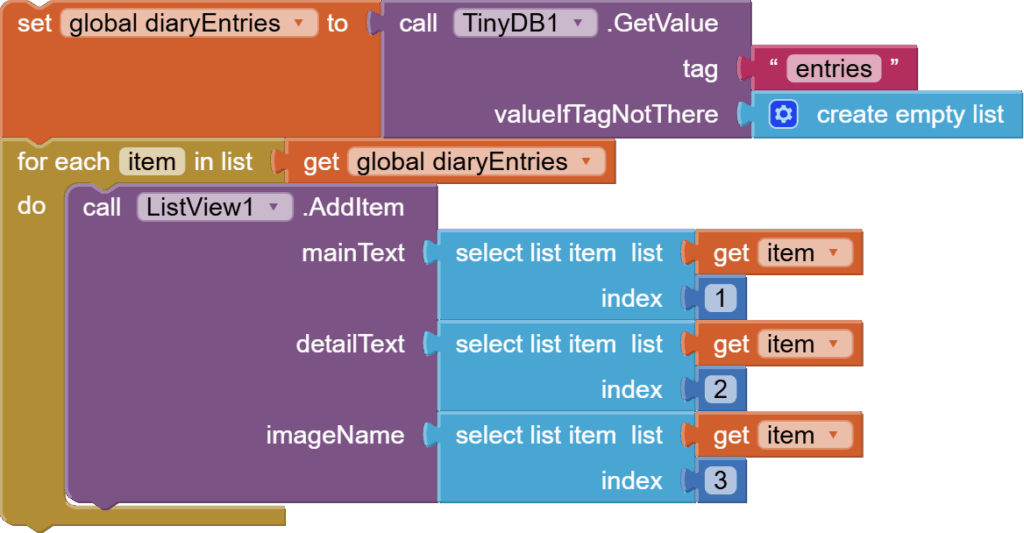
Now, go back to your screen1.initialize event and we need to load diary entries from TinyDB here.
So, set the diary entries list to the data returned by TinyDB against the tag “entries”. The spellings of the tag are super important.
Then go through the diary entries list one by by using the Control’s for each item block and add items to the listview.
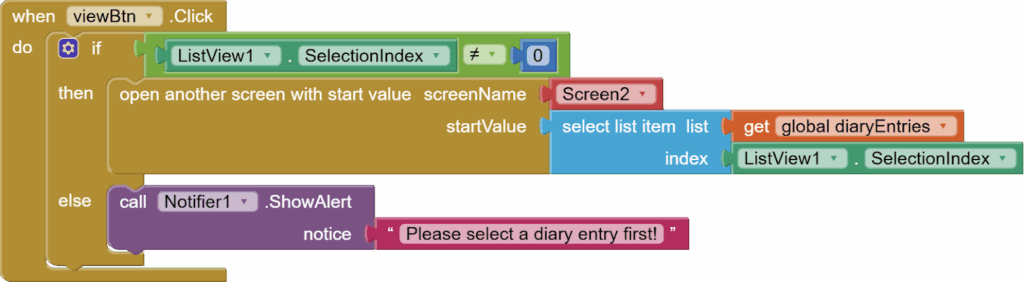
Now, get viewBtn click event. Check if listview.selection index isn’t 0 using Control’s if/else block (this is to confirm that the user has tapped on an item in the listview). Show a relevant message using the notifier’s show alert in the else.
In if condition, use open another screen block from Control to open screen2, but with startValue: the item in our diaryEntries list against the selection index from the listview.
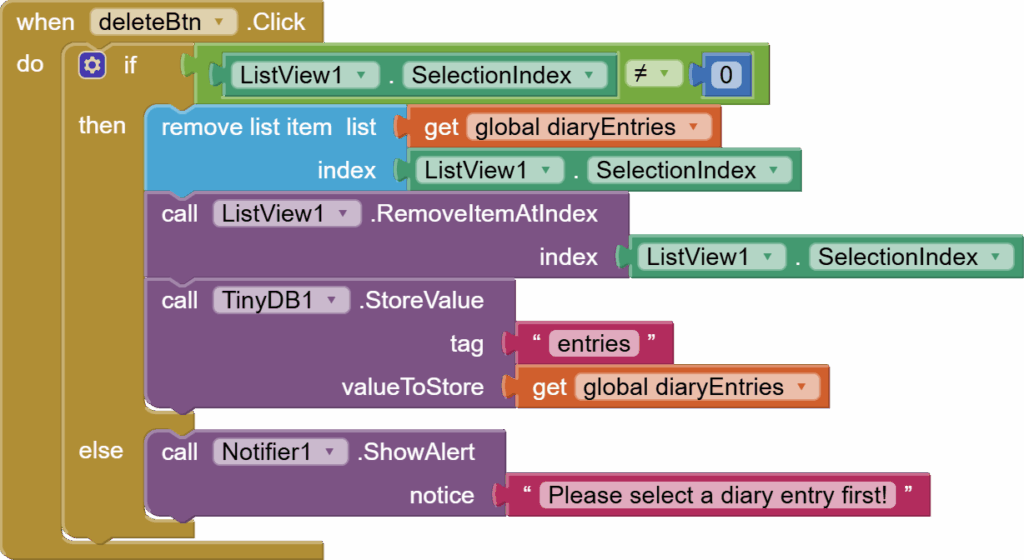
Get the delete button click event. Again, do a similar error check to confirm that the user has tapped on an item in the listview. Then, remove the item from the global list diaryEntries and from the listview. After all this, store the updated list in tinyDB.
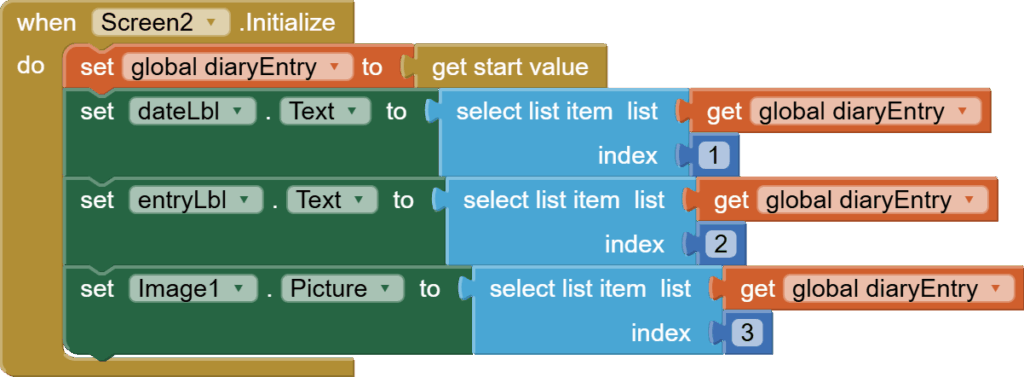
Now, open up screen 2 blocks section. Simple code here:
Make a global list variable for diaryEntry.

When the screen is initialized, set this diary entry to get start value block from Control. This is the data being sent by screen1.
Now, just set all the components on the screen: dateLbl, entryLbl, and image.
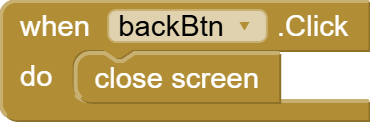
Get the back button click event and just plug in the close screen block from Control.
And we are done. This cool diary app with pictures is done, and you have learned many new things that you can use in other apps too.
You can also have a look at the video tutorial here:
Please like my videos and share it with your friends and family. Also, subscribe to my channel and press the bell icon so you don’t miss any of the great projects I have planned for you.
https://www.youtube.com/c/obsidiansofteducation
Please like my Facebook page and Instagram page for more educational resources and tips.
Facebook: https://www.facebook.com/ObsidianSoft/
Instagram: https://www.instagram.com/obsidiansoftapps/
Pinterest: https://www.pinterest.com/obsidiansoft/
For links to free educational apps, have a look at the educational apps page