Hello friends,
Today’s tutorial is inspired by a valued follower’s request. We will be creating a Favourite Contacts app in MIT App Inventor, where you can save your most important contact numbers and call them with just one click. Let’s get started!
Open up MIT App Inventor.
Start a new project and call it ContactsApp.
In screen 1 properties, make the background color orange and align horizontal center.
Now, drag and drop a PhoneNumberPicker component from the Social palette onto the viewer. There is a similar component called ContactPicker. However, a PhoneNumberPicker shows all contacts with phone numbers, whereas a ContactPicker shows even such contacts that might not have a phone number associated with them. So, for this app, it is more efficient to use a PhoneNumberPicker. In its properties, make the background color white, font bold, font size 18, shape rounded, and change the text to “Add Contact”.
Add a ListView component from the User Interface palette below it.
Now, add a horizontal arrangement below this listview from the layout palette. Make align horizontal and align vertical center alignment for it. Add a button from the user interface inside this arrangement. Rename it to callBtn. Make the background color white, font bold, font size 18, shape rounded, and change the text to “Call”. Select this button and duplicate it by pressing Ctrl + C and Ctrl + V on the keyboard for Windows OS OR Command + C and Command + V on the keyboard for MacOS. Rename this button to deleteBtn. Change the text to “Delete”.
Now, add a PhoneCall component from the Social palette for making the phone call.
Add a TinyDB component from the Storage palette for storing the contacts on the device.
Also, add a Notifier component from the User Interface palette for error messaging.
Our UX design is done, so let’s go to the blocks section.
Make a global list variable for storing the favorite contacts.

When the user clicks on the phone number picker component and chooses a phone number, the component’s after-picking event is triggered, so get that block by choosing phone number picker on the left-hand side. The phone number picker’s contact name property is filled with the picked phone number’s contact name, and the phone number property is filled with the picked phone number. Do a join of these two properties with a “ – “ between…it is a space dash space, and add this item to the global contacts list variable.
Store this list in TinyDB and then provide it as elements to the listview.

When the screen is initialized, i.e., the app is started, we need to load already stored favorite contacts from tinyDB and show them in the listview. So, load the global contacts list from the tinyDB. Make sure to use the same tag that you used for storing the contacts in the TinyDB. Provide this list to the listview elements.

Now, we come to the calling logic. Get the call button click event. First, do some error handling, i.e., check that the user has chosen a contact by tapping on it before clicking the call button. So, add an if/else block to check that the listview’s selection index isn’t equal to 0. Now, we need to extract the phone number from the selected index of the list. So, split the selected list item at “ – “. We will be returned a list of two items, and we know that the second item is the phone number, so get that using index=2 and set it to the phone call component’s phone number property. Now, we have two ways of using the phone call component to make a phone call: MakePhoneCall or MakePhoneCallDirect. MakePhoneCall doesn’t require any special permissions, so it can run in the companion app. MakePhoneCallDirect will not work in the companion app and you will need to install the app on your device and then give permission to the app when a permission dialog pops up; it will dial the number for you. On the other hand, MakePhoneCall will open up the keypad with the number loaded in it, but you will have to click the dial button yourself. So, decide what you want to do. I will go with MakePhoneCallDirect, but let me repeat that this will give an error on the companion app. You need to install it on your phone, give it permission when it asks, and then it will work.
In the else condition, show an alert message using the notifier.

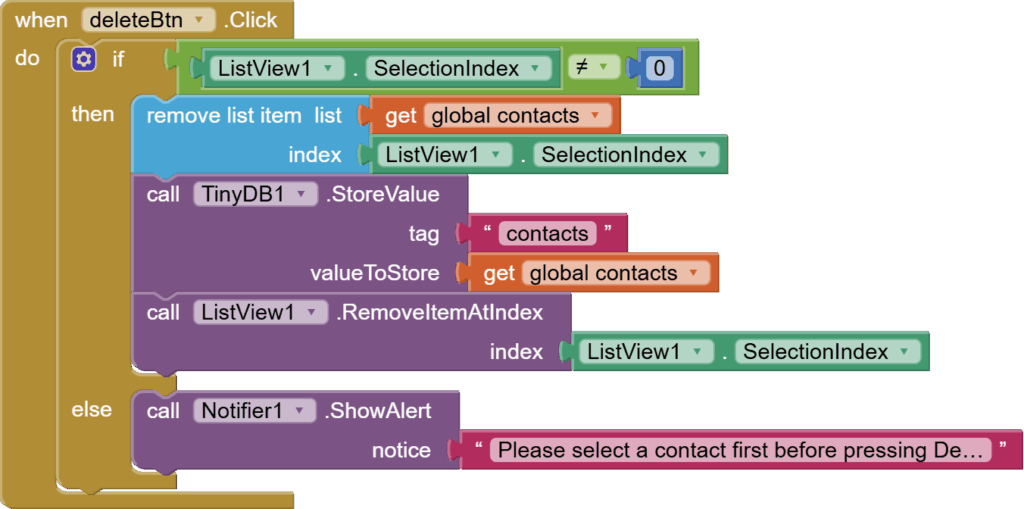
Last is the delete button click event. Check for selection again. If selected, then remove the selected item from the contacts list, store the updated list in TinyDB, and also remove the selected item from the listview. Otherwise, show an alert message about selecting a contact before pressing the Delete button.
And this is done. I hope you liked this tutorial. You can have a look at the video tutorial here:
Please like my videos and share it with your friends and family. Also, subscribe to my channel and press the bell icon so you don’t miss any of the great projects I have planned for you.
https://www.youtube.com/c/obsidiansofteducation
Please like my Facebook page and Instagram page for more educational resources and tips.
Facebook: https://www.facebook.com/ObsidianSoft/
Instagram: https://www.instagram.com/obsidiansoftapps/
Pinterest: https://www.pinterest.com/obsidiansoft/
For links to free educational apps, have a look at the educational apps page