Hello friends,
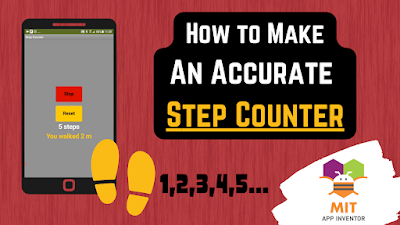
Welcome to Obsidian Soft. In this tutorial, I will show you how to make a simple step counter app in MIT App Inventor. I will also show the approximate distance covered in this app. You can expand on this MIT App Inventor Pedometer app, and ask the user to enter his/her weight, height, and gender and calculate calories burned too.

So, let’s begin. Open MIT App Inventor and start a new project. Call it StepCounter.
In screen 1 ‘s properties, make align horizontal and align vertical both center and the background color: gray. Change the title to Step Counter. And make the screen orientation: portrait.
Drag and drop a button from the User Interface onto the Viewer. Rename to startStopBtn. Make the background color: green. Make the font: bold and font size: 22. Make the height 10% and width 30%. Also, make the shape rounded and change the text to “Start”.
Select the button and duplicate it by pressing Ctrl + C and Ctrl + V for Windows and Command + C and Command + V for MacOS.
Rename to resetBtn, make the background color: orange and change the text on it to “Reset”.
Drag and drop a label from User Interface below this resetBtn.
Rename to stepsLbl. In its properties, make font: bold and font size: 30. Change textColor to white and change the text to “0 steps”.
Select this stepsLbl. Again duplicate it. Rename to distanceLbl. Change textColor to orange and change the text to “You walked 0 m”.
Drag and drop a pedometer from the Sensors. This is a non-visible component. In its properties, change its stopDetectionTimeout to 1000 ms to make it more responsive. I will also optionally change the strideLength to 0.5 m as I felt that it was more accurate for me this way.
Lastly, I will also add an empty label between the buttons for spacing. Remove text from it and make height: 2%.
Our screen design for MIT App Inventor Pedometer app is done so go to the blocks section.
You might be wondering, where the stop button is. Our startStop button is basically a toggle button and we will switch between the two states of start and stop.
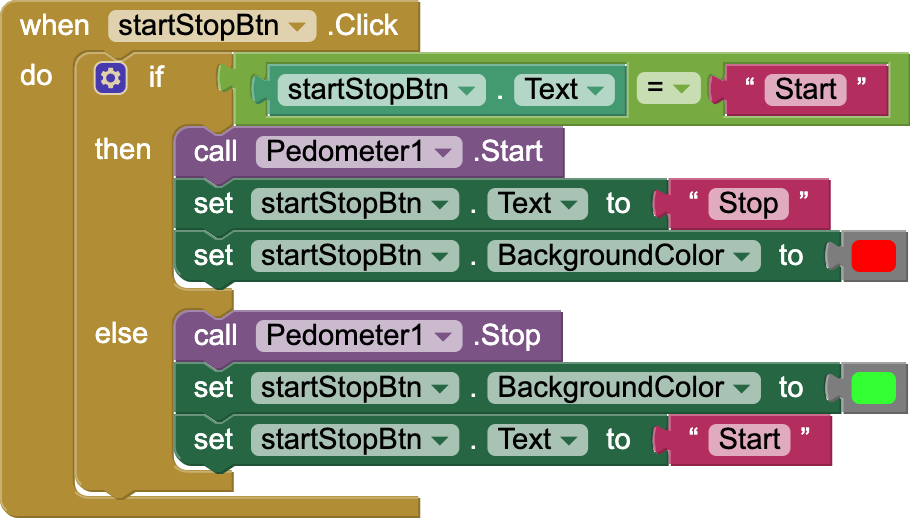
So, get the startStopBtn’s click event, plug in the if/else block from Control in it, and use a logic green block to check in the if condition if startStopBtn’s text is equal to the text block “Start”.

In case the button’s text is equal to Start and the if condition is true, then this means that the button was in the start state when it was pressed so we have to start the pedometer. So, first of all, start the pedometer by plugging in its start block. Next, we have to change the button state to the Stop state. So, change the text to “Stop” and change the background color of the button to red.
In the other scenario, we don’t have to specifically check for the Stop state as our button can only have two states: Start and Stop. So, if start is not true then this means that the button was in a stop state when its click event was triggered. So, now we have to stop the pedometer. So, use the pedometer’s stop block. And in the end, change the button state to start by changing its color and text accordingly.

Be careful with the spelling of Start. It should be the same as what you used in the designer for startStopBtn’s properties.
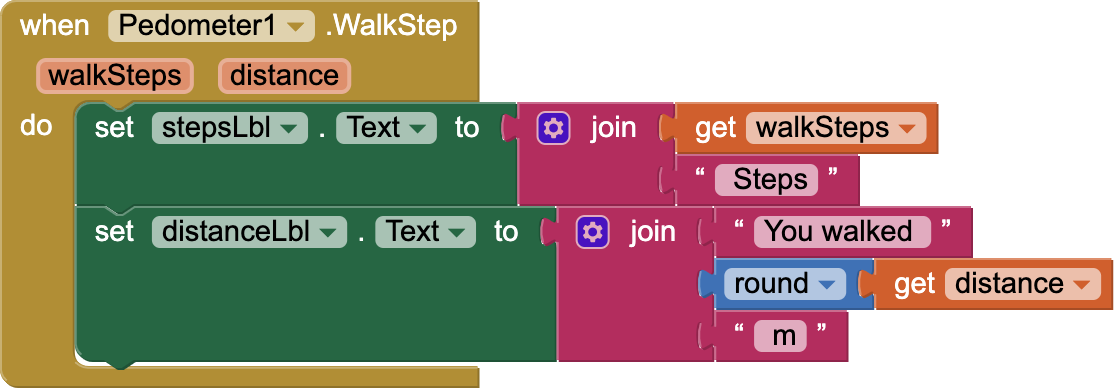
Next, get the pedometer.WalkStep event. I will not use the simple step event as according to the MIT App Inventor documents, WalkStep is a much more accurate counter of walking as it also evaluates whether the step is accompanied by a forward motion and that is what an actual walking step should be. So, you can see that the pedometer sensor component of MIT App Inventor has made making a step counter app super simple.
Now, get the walk steps and distance from the event and show them to the user by using join blocks.

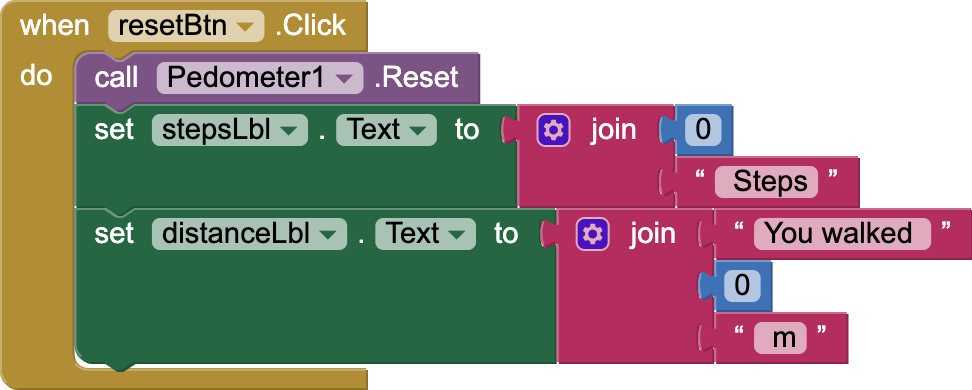
In the case of resetBtn’s click event, just reset the pedometer and reset the stepsLbl and distanceLbl to zero values.

The step counter app using MIT App Inventor pedometer is done and it was super easy making this fun step counter app using the pedometer sensor component of MIT App Inventor.
You can download the project file from the link below:
Thank you for reading this tutorial. I hope you liked this tutorial. Please like and share it.
If you like my tutorials, consider supporting me:
You can also have a look at the video here:
Please like my videos and share them with your friends and family. Also, subscribe to my channel and press the bell icon so you don’t miss any of the great projects I have planned for you.
https://www.youtube.com/c/obsidiansofteducation
Please like my social media pages for more educational resources and tips.
Facebook: https://www.facebook.com/ObsidianSoft/
Instagram: https://www.instagram.com/obsidiansoftapps/
Pinterest:
https://www.pinterest.co.uk/obsidiansoft/_created
For links to free educational apps, have a look at the educational apps page

