Hello friends and welcome to Obsidian Soft,
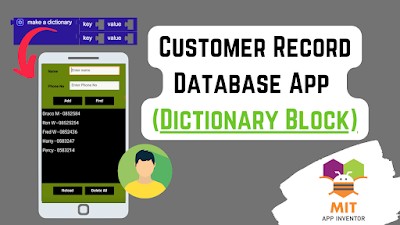
Today, I will show you how to make database app in MIT App Inventor in which we can keep data records such as customer records.

We used the dictionary blocks when we made the GPT voice assistant app.

However, I didn’t go into the details of the dictionary block as I thought that it would make the video too complicated for my viewers.
Today, I will explain the basic concept of a dictionary. In MIT App Inventor, a dictionary block is a way to store and organize data in pairs called “key-value” pairs.

It’s similar to a real-life dictionary where you look up a word (key) to find its meaning (value).

For example, let’s say we want to store information about a person, such as their name, phone number, and city. In a dictionary, we can assign a unique key to each piece of information. So, “name” can be the key to the person’s name, “phone number” can be the key to their phone number, and “city” can be the key to their city.
Using a dictionary block, we can create this collection of information and associate each key with its corresponding value. We can access or modify specific values by referring to their keys.

And, we can even store this dictionary in a database such as TinyDB or cloudDB. So, you will also learn how to store multiple data or a record in the database in MIT App Inventor.
Let’s explain this concept practically using a very helpful app that you can use in your future projects. In our scenario, we have a departmental store and we want to store data about our regular customers so that we can tell them about deals and offers. Basically, we want to make a customer record system and the customer data will include the name and phone number; keeping things simple here.
Open up MIT App Inventor and start a new project. Call it CustomerData.
Drag and drop a vertical arrangement from the Layout. Rename it to mainScreenLayout. Make align horizontal and align vertical center. Make height and width both fill parent.
Drag and drop a horizontal arrangement from the Layout and put it inside the mainScreenLayout. Make align horizontal and align vertical center. Make height 10 percent and width fill parent.
Drag and drop a label from the User Interface inside this horizontal arrangement. Rename it to nameLbl. Check FontBold and make
FontSize: 18
Width: 25%
Text: Name.
Drag and drop a textBox from the User Interface. Rename it to nameTxt. Check FontBold and make
FontSize: 18
Width: 60%
Hint: Enter name
Select the horizontal arrangement and duplicate it by pressing Ctrl + C and Ctrl + V on Windows OR Command + C and Command + V on MacBook.
Rename the label to phoneLbl and make text: Phone No
Rename the textBox to phoneTxt.
Make the hint: Enter Phone No
Check numbers only.
Duplicate the horizontal arrangement again but remove the label and text from it. Drag and drop a button from the User Interface inside this empty horizontal arrangement. Rename it to addBtn. Optionally give it a black background color. Check FontBold and make
FontSize: 18
Width: 35%
Shape: Rounded
Text: Add
And TextColor: White
Duplicate this button and rename it to findBtn and make text: Find.
Add a listView from the User Interface below the buttons arrangement. Make sure that it is also inside the mainScreenLayout. Make height 50%.
Duplicate the buttons arrangement and put it below the listView. Rename addBtn to reloadBtn and change the text to Reload. Rename findBtn to deleteAllBtn and change the text to Delete All.
Last but not least, drag and drop a TinyDB from Storage.
The screen design is done so let’s work on the blocks section.
Make a global variable for a record that is an empty dictionary and a global variable for a list of records that is an empty list.

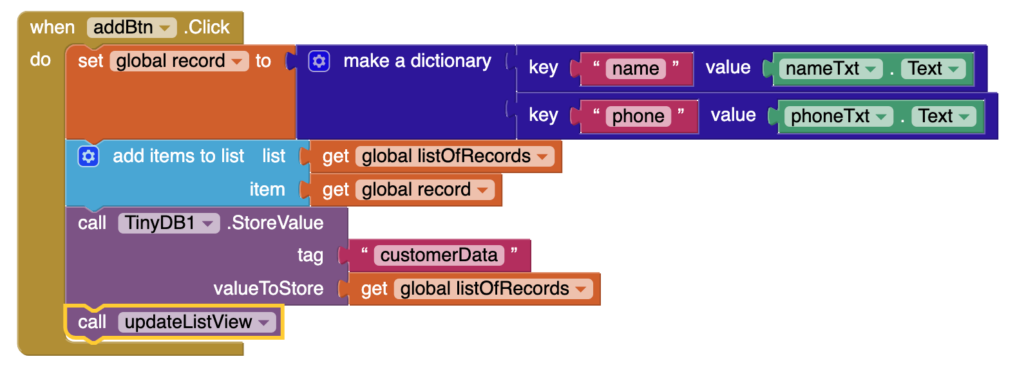
First, we will set our global record to a dictionary with appropriate key-value pairs.

Then, we will add this record to the list of records

Then, we will store data in our tinyDB with the tag customerData.

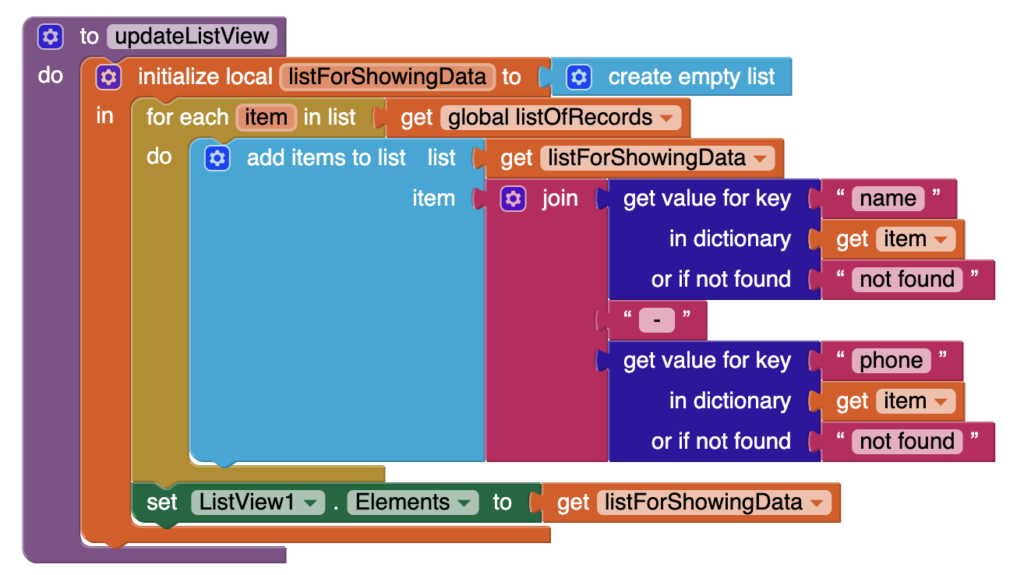
Now, we need a procedure for showing this customer data in our listview so let’s make it first. Go to procedures and get the first type of procedure and call it updateListView.

First , we will get a local variable from the variables section and make it an empty list. Inside it, we will put a loop that will go through all the records/dictionaries inside our list of records and get all values for the different keys and use a join to make new items for our listForShowingData. At the end of the loop, we will give this new list to the listView’s elements. Now, we need to call this updateListView procedure from our addBtn so call it at the end of addBtn.click event.

Now, we need to show existing data in our listview when the app is started so get screen1.initialize event and call tinyDB’s getValue procedure with tag customerData and assign the result to the list of records variable and then, we call updateListView procedure.

When the user clicks the delete all button, we want to delete all customer records and also empty our listview.

So, the basic app is done where we can add records with multiple data i.e. name and phone number using a dictionary and save it in our tinyDB. We can also load the current status of the DB when the screen is initialized and we can delete all records. I will cover search records by name and updating and deleting a single record in part 2 of this tutorial.
If you like my tutorials, please consider supporting me:
Part 2 Tutorial is now available.
You can also download aia file for this project (part 1).
And, you can also have a look at the video tutorial here.
Please like my video and share it with your friends and family. Also, subscribe to my channel and press the bell icon so you don’t miss any of the great projects I have planned for you.
https://www.youtube.com/c/obsidiansofteducation
Please like my Facebook page and Instagram page for more educational resources and tips.
Facebook: https://www.facebook.com/ObsidianSoft/
Instagram: https://www.instagram.com/obsidiansoftapps/
Pinterest:
For links to free educational apps, have a look at the educational apps page

