Hello friends and welcome to Obsidian Soft
In my previous tutorials on Google Sheets, I showed you how to easily write to a Google sheet using forms and also read the entire sheet into the MIT App Inventor app. This was a simple and easy approach that came with limitations. We couldn’t update the rows or delete rows programmatically. We also couldn’t differentiate between different sheets in our spreadsheet. In this tutorial, which I will try my best to simplify, we will not just create rows in Google Sheets but also delete or update a particular row through our MIT App Inventor app. We will also use sheet names so that if our spreadsheet has multiple sheets, we can do our operations on a particular sheet.
So, let’s begin. First of all, let’s make a google sheet:
https://docs.google.com/spreadsheets/u/0
Make sure that you are logged in using your Gmail account. Click on the + button to create a blank spreadsheet.
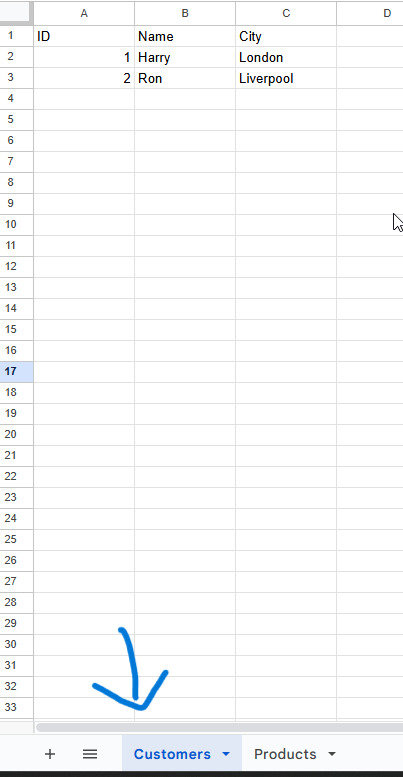
Add some headers in the first row of the sheet: ID, Name, City
Also, rename the sheet1 to Customers. Add some sample data to it too.
Now, look at the address bar in your browser. You will have the spreadsheet’s URL there:
https://docs.google.com/spreadsheets/d/1n5kGHrAhhIhYph0c-tRedRtlILqv8aRCEyYtDeDnBJ/edit?gid=0#gid=0
The highlighted part between d/ and /edit is the id of your spreadsheet. Please don’t use mine. You have to create your own spreadsheet. Copy and paste this URL in some text editor like notepad as this is our spreadsheet id.
Now, navigate to Extensions > Apps Script in the spreadsheet menu. A new browser window will open up.
Remove the code from it. Copy and paste the following code in it but remember to update your spreadsheet id with the one that you got from the browser URL and that you had copied and pasted in Notepad. You have to do it for both doGet and doPost functions in this script. Also, you will have to update the script for your parameters. For example, I have id, name, and city but if you have different parameters, change it accordingly. I will explain more about this change later.
Don’t forget to update the spreadsheet id for both doGet and doPost functions.
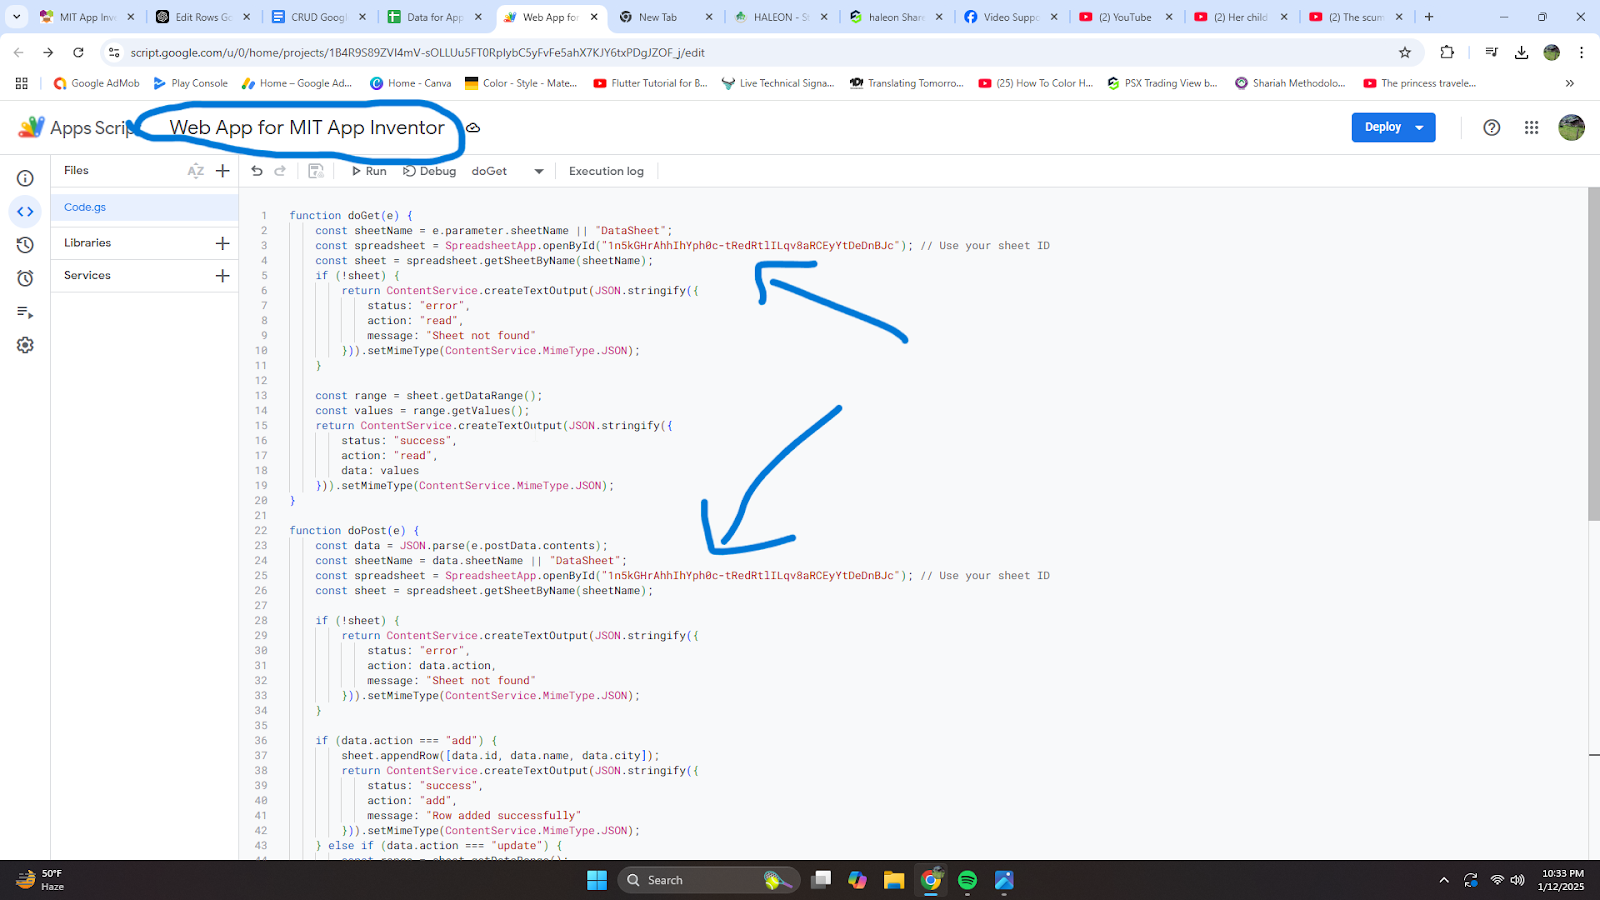
function doGet(e) {
const sheetName = e.parameter.sheetName || "DataSheet";
const spreadsheet = SpreadsheetApp.openById("your-spreadsheet-id"); // Use your sheet ID
const sheet = spreadsheet.getSheetByName(sheetName);
if (!sheet) {
return ContentService.createTextOutput(JSON.stringify({
status: "error",
action: "read",
message: "Sheet not found"
}));
}
const range = sheet.getDataRange();
const values = range.getValues();
return ContentService.createTextOutput(JSON.stringify({
status: "success",
action: "read",
data: values
}));
}
function doPost(e) {
const data = JSON.parse(e.postData.contents);
const sheetName = data.sheetName || "DataSheet";
const spreadsheet = SpreadsheetApp.openById("your-spreadsheet-id"); // Use your sheet ID
const sheet = spreadsheet.getSheetByName(sheetName);
if (!sheet) {
return ContentService.createTextOutput(JSON.stringify({
status: "error",
action: data.action,
message: "Sheet not found"
}));
}
if (data.action === "add") {
sheet.appendRow([data.id, data.name, data.city]);
return ContentService.createTextOutput(JSON.stringify({
status: "success",
action: "add",
message: "Row added successfully"
}));
} else if (data.action === "update") {
const range = sheet.getDataRange();
const values = range.getValues();
let rowFound = false; // To track if the row is found
for (let i = 1; i < values.length; i++) {
if (String(values[i][0]).trim() === String(data.id).trim()){
// Update the name and city
sheet.getRange(i + 1, 2, 1, 2).setValues([[data.name, data.city]]);
rowFound = true;
return ContentService.createTextOutput(JSON.stringify({
status: "success",
action: "update",
message: "Row updated successfully"
}));
}
}
// If no matching row is found
if (!rowFound) {
return ContentService.createTextOutput(JSON.stringify({
status: "error",
action: "update",
message: "Row not found"
}));
}
}
else if (data.action === "delete") {
const range = sheet.getDataRange();
const values = range.getValues();
for (let i = 1; i < values.length; i++) {
if (String(values[i][0]).trim() === String(data.id).trim()){
sheet.deleteRow(i + 1);
return ContentService.createTextOutput(JSON.stringify({
status: "success",
action: "delete",
message: "Row deleted successfully"
}));
}
}
return ContentService.createTextOutput(JSON.stringify({
status: "error",
action: "delete",
message: "Row not found"
}));
}
return ContentService.createTextOutput(JSON.stringify({
status: "error",
action: data.action,
message: "Invalid action"
}))
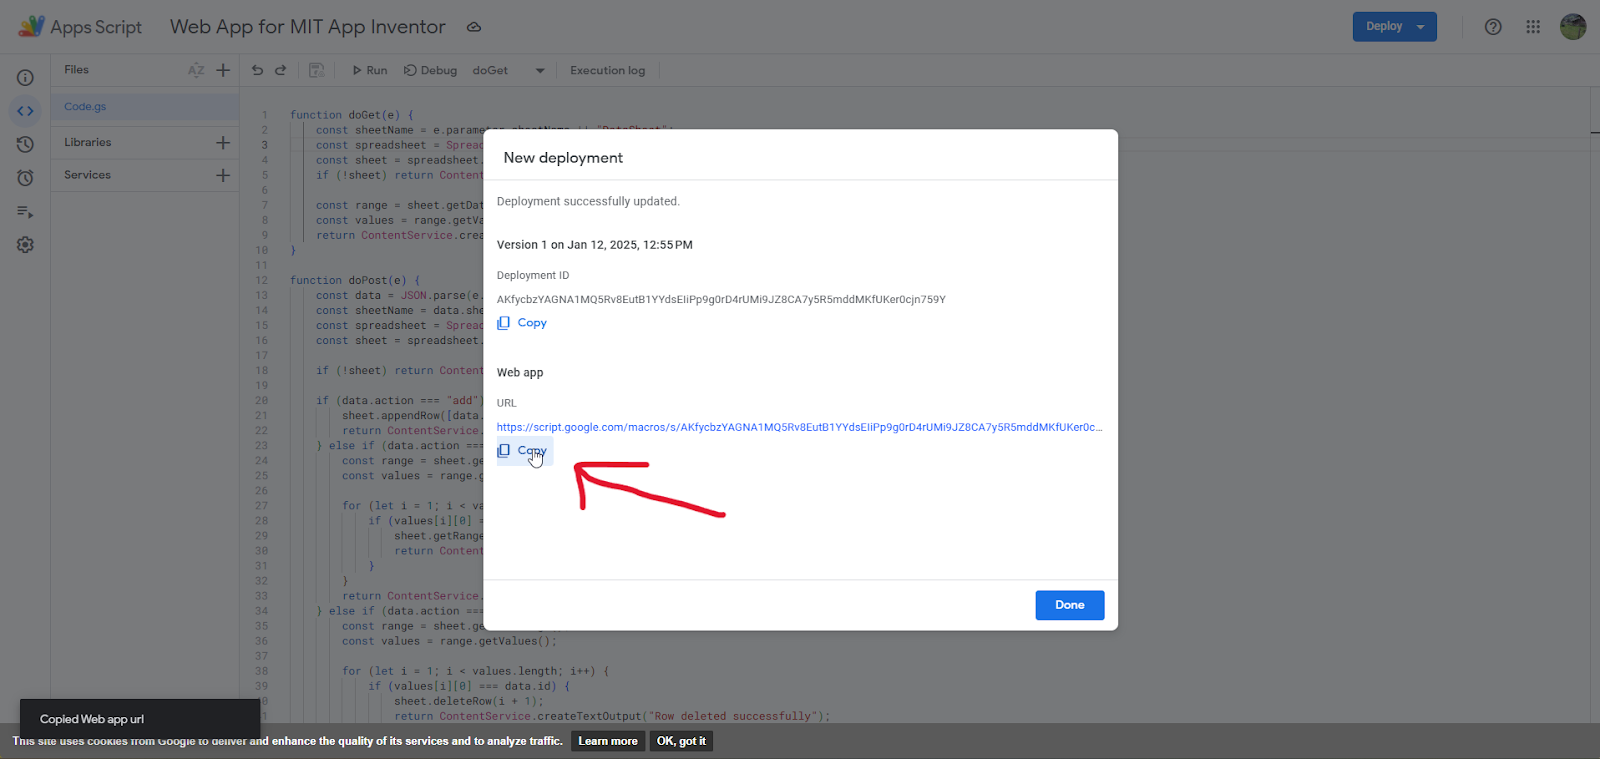
}You can see in the following screenshot that I have copied pasted the code and updated the spreadsheet id. I have also renamed the project to Web App for MIT App Inventor.
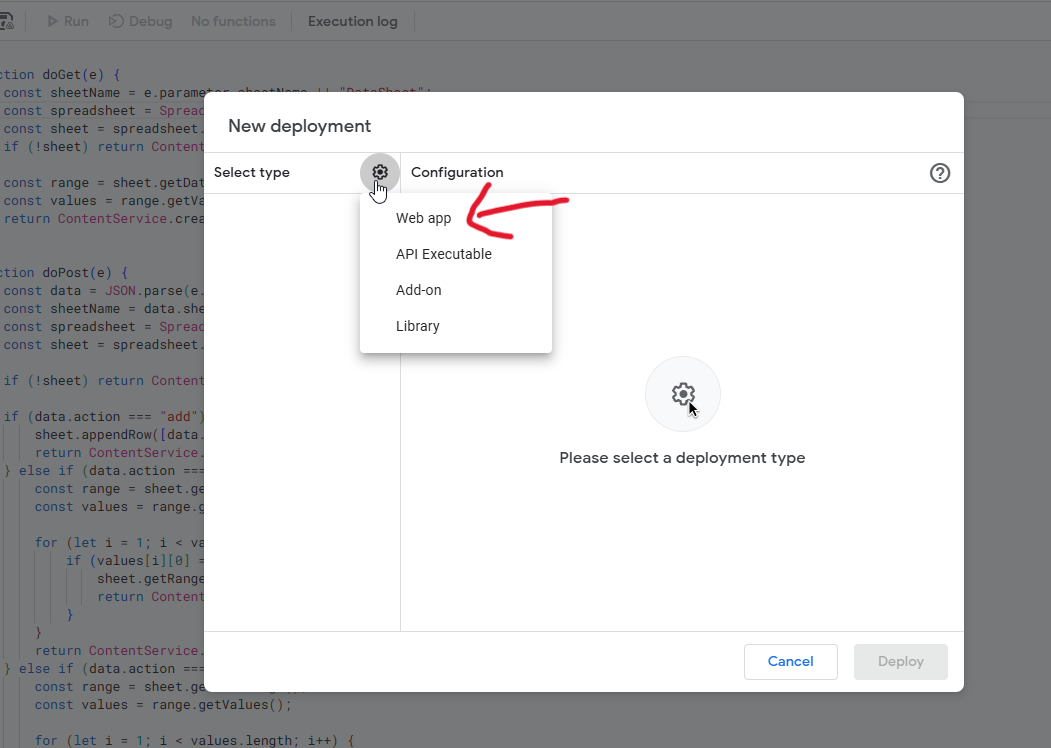
Now, click on the deploy button.
Choose New deployment.
Choose Web app.
Set the Execute as field to Me.
Set the Who has access field to Anyone and click on Deploy button on the dialog.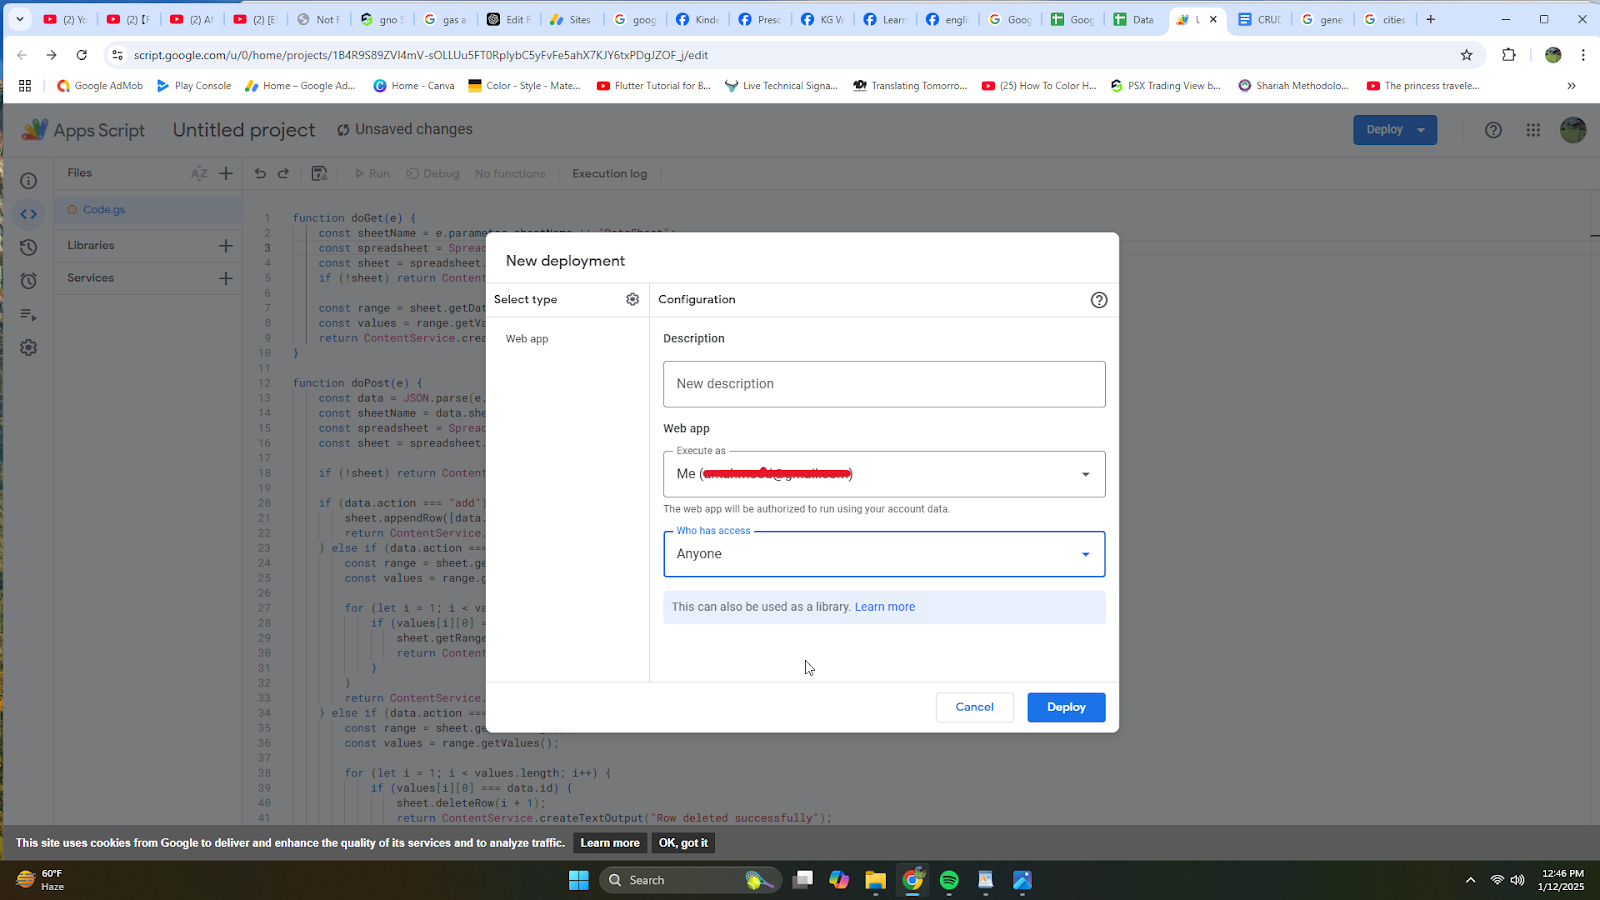
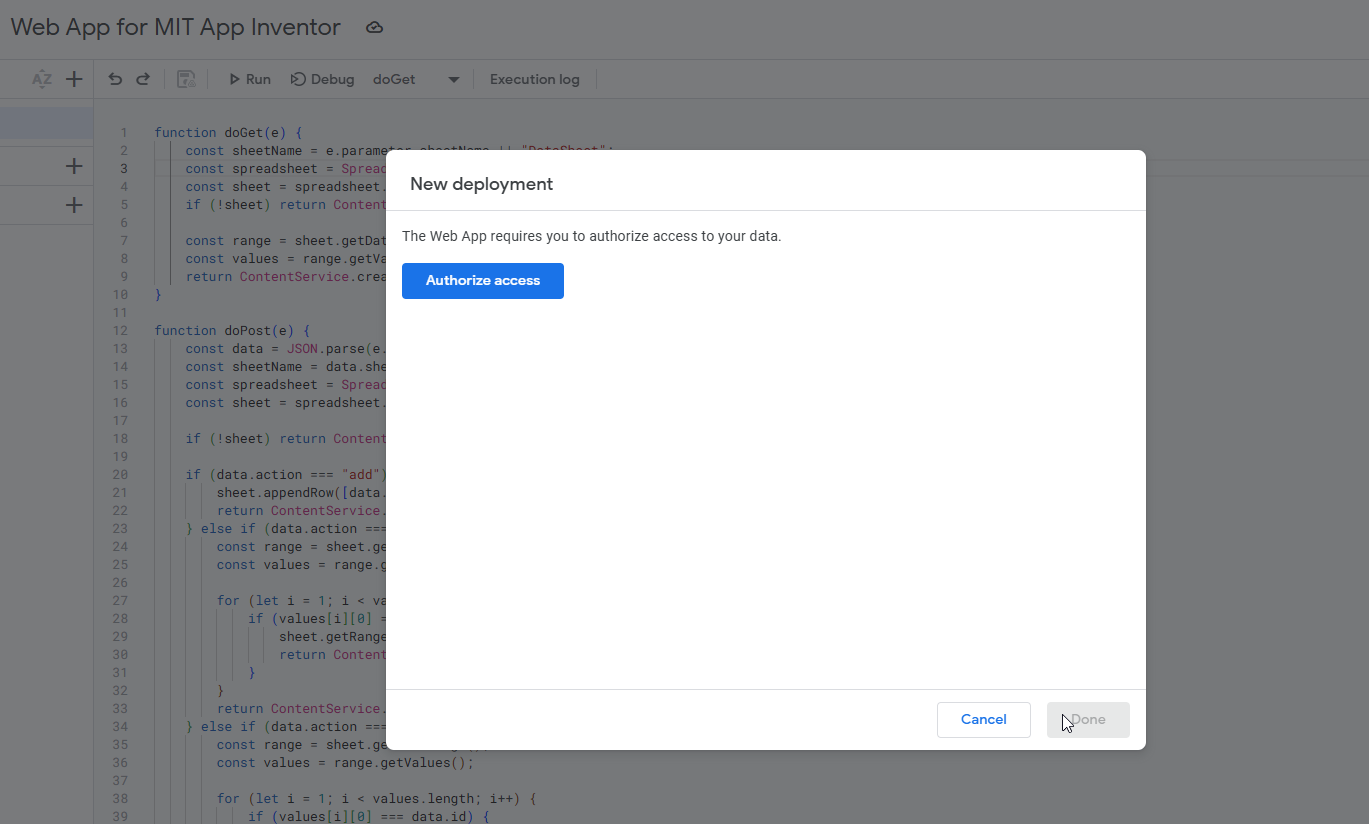
Since it is a new deployment, a new authorization dialog will pop up. Click on the Authorize access button.
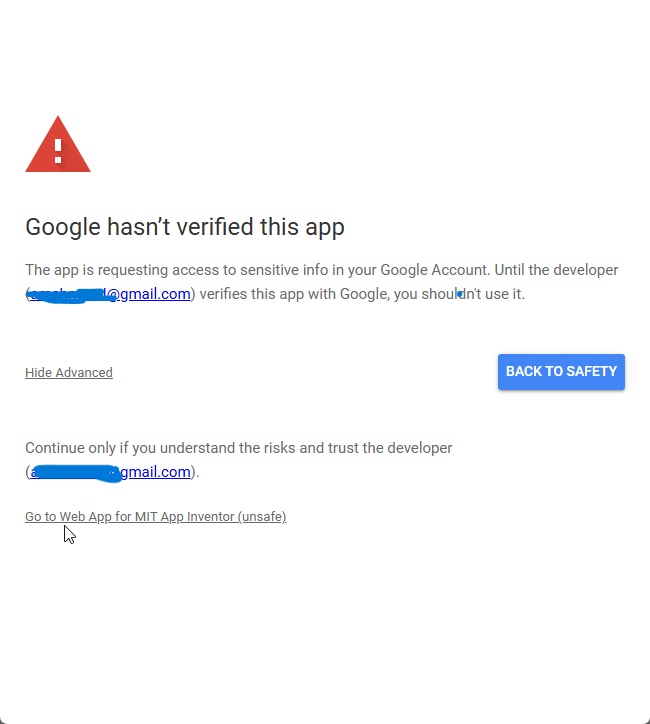
You will be asked to choose a Google Account. Choose it and click on the Advanced link on the dialog that pops up.

Click on the Go to “project name of your web app”. I had renamed it to “Web App for MIT App Inventor”. If you haven’t renamed it, it will say “Untitled Project”.
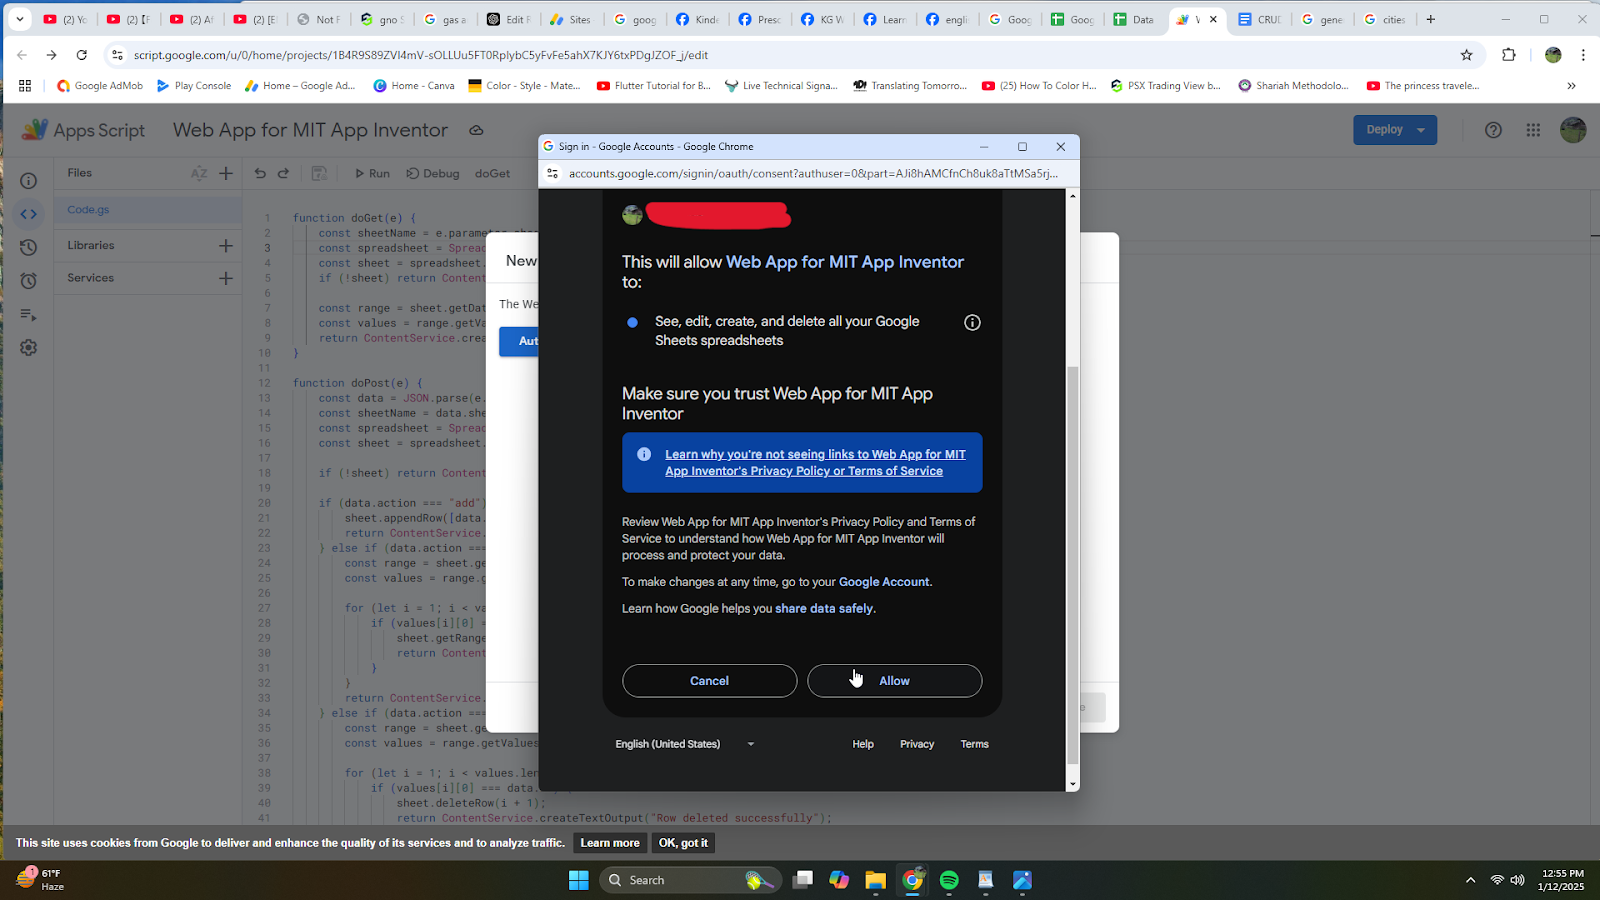
Another dialog will pop up. Scroll down and click on Allow button.
Copy and paste the web app URL into a text editor like notepad as we will need it later.
(At any time, if you make a change to the web app script, you have to click on deploy button again and and choose manage deployments and save changes)
Now, Open up MIT App Inventor and start a new project. Name it CRUDGoogleSheet.
Drag and drop a vertical arrangement from the Layouts palette onto the viewer. Rename this arrangement to mainScreen. Make width and height both fill parent.
Drag a listview from the user interface palette onto this mainScreen vertical arrangement and in its properties, make width: fill parent.
Add a horizontal arrangement from layouts below it. Make align horizontal and align vertical both center. Make height 15% and width fill parent. Drag and drop a button from the user interface palette inside this horizontal arrangement. Rename to addBtn. Make the background color blue, font bold, font size 20, width 30%, shape rounded and text: Add. Select the button and duplicate it by pressing Ctrl + C and Ctrl + V on the keyboard for windows OR Command + C and Command + V on the keyboard for MacOS. Rename it to updateBtn and change text to “Update”. Duplicate again and rename it to deleteBtn and change text to “Delete”. Now, select the mainScreen vertical arrangement and in its properties, uncheck the “Visible” checkbox.
Now, add another vertical arrangement onto the viewer. Rename it to addScreen. Make width and height fill parent. This is the concept of virtual screens. There is no need to pass data between two screens as we are technically still on the same screen.
Drag and drop a horizontal arrangement onto this addScreen vertical arrangement. Make align horizontal and align vertical both center. Make height 15% and width: fill parents.
Add a label from user interface to this horizontal arrangement. Rename it to idLbl. And change text to “ID:”. Add a textbox from the user interface on the right of the label. Rename it to idTxt.
Select the horizontal arrangement, duplicate it and update it for Name. Do the same thing for city
Duplicate horizontal arrangement again and remove the label and textbox from it. Add a button. Rename it to saveBtn. Give it the same properties as the ones that you gave to the addBtn. Change the text to “Save”. Select the button. Duplicate it and rename it to cancelBtn and change the text to “Cancel”.
Drag a web component from the Connectivity palette onto the viewer. Also, drag a notifier from the user interface onto the viewer.
Now, select the addScreen arrangement and make it invisible by unchecking the visible checkbox.
Make the mainScreen visible by checking the visible checkbox.
Our screen design is done so let’s go to the blocks section.
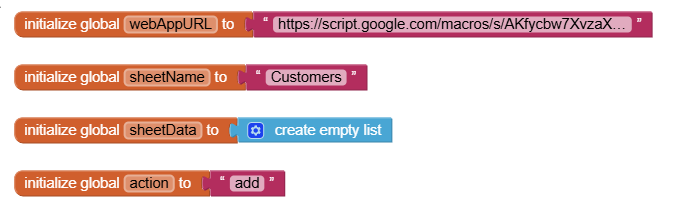
Make a global variable for sheetData (an empty list in the beginning)
Another variable sheetName and set it to your sheetName (in my case, it is “Customers”).
Add a status variable called action (this will play a role in updating, adding, and deleting). Also, add a global variable for webAppURL and set it to your webAppURL that you had copied earlier.
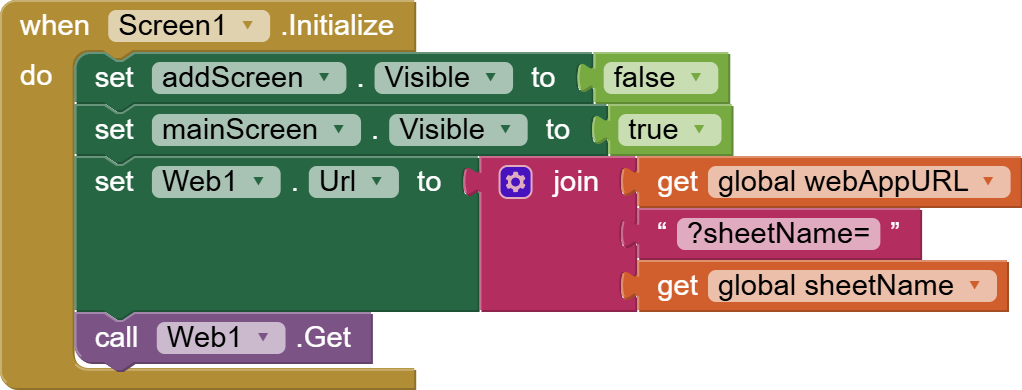
Get the screen1’s initialize event.
Make addScreen visible to false and mainScreen visible to true. This is an extra step to make sure that the correct screen is visible when the app is started.
Click on the web1 component and get its setUrl block.
Set it to a join block with 3 slots. You can click on the cog wheel to add more slots.
Put the get block for webAppURL in the first slot. In the second slot, add a text block with this:
?sheetName=
In the third slot, plug in the get block for the global variable sheetName. After this call Web1.Get.
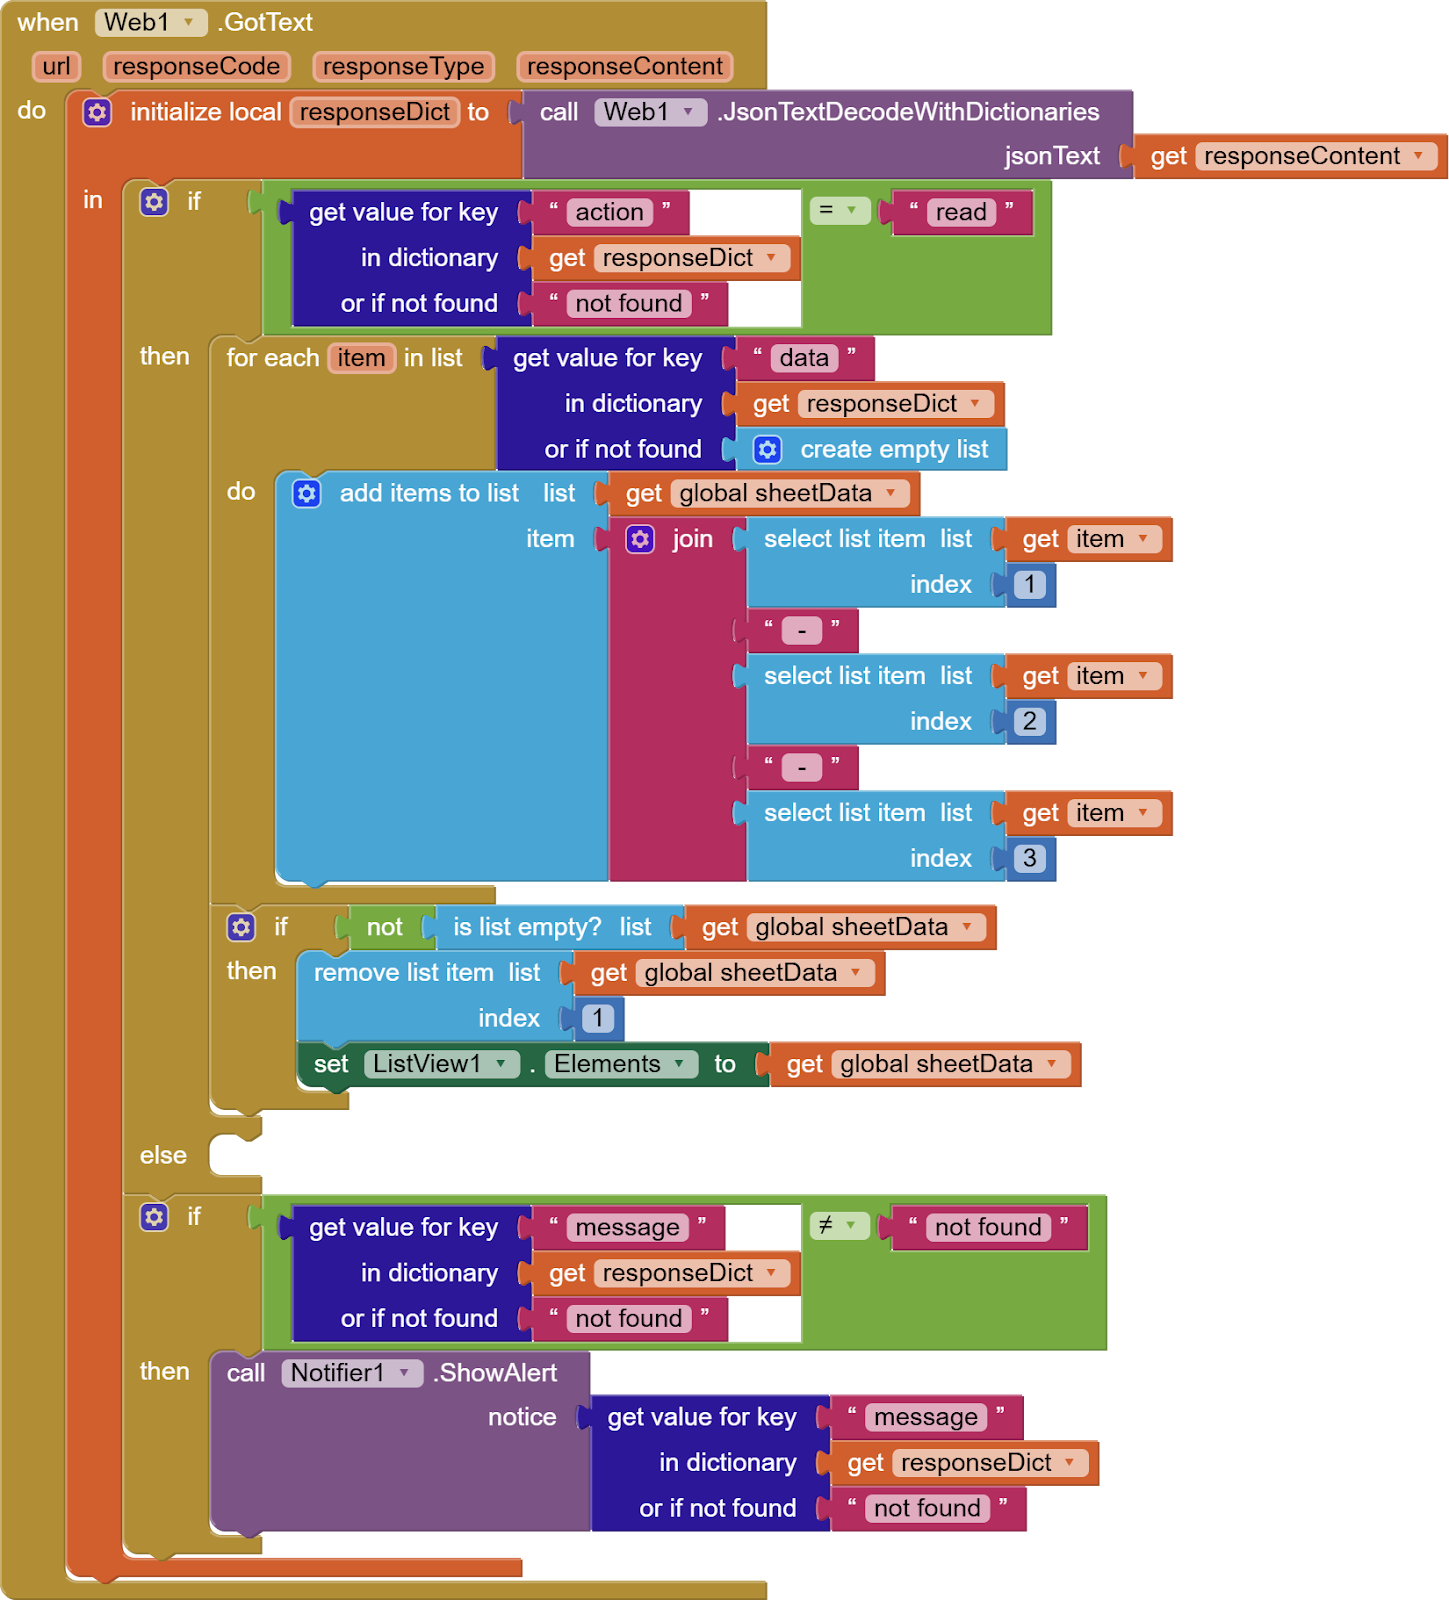
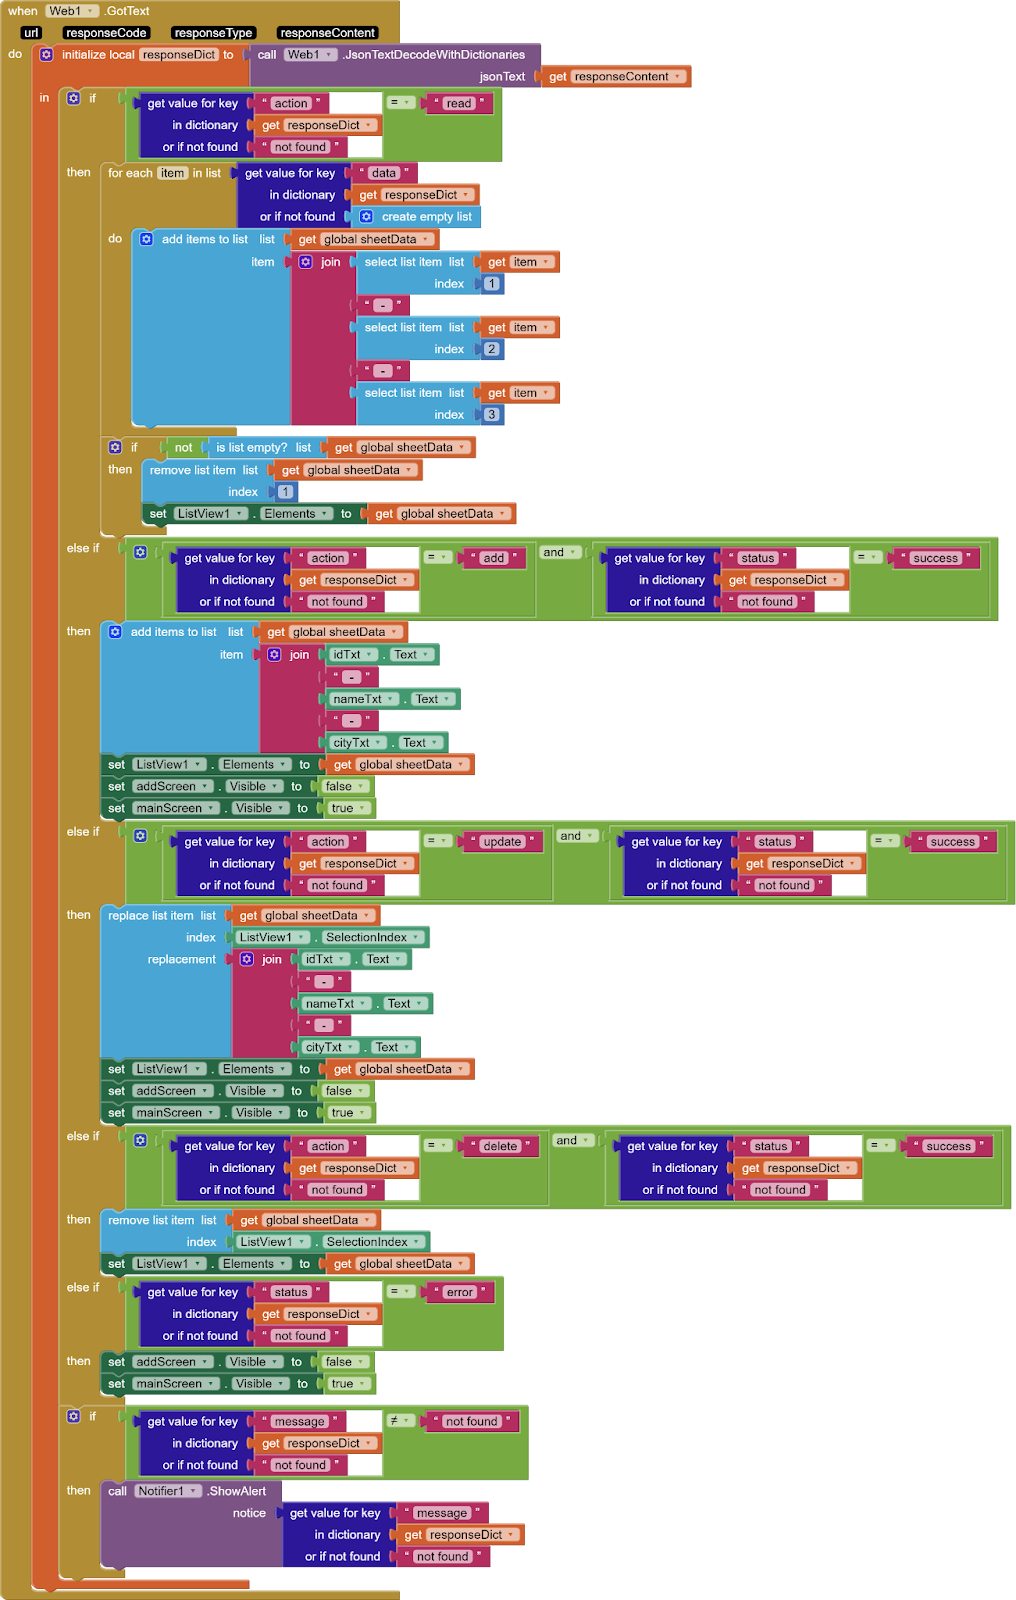
In web1. gotText event, responseContent contains the response returned by the Web app. Make one local variable for responseDict. Use Web1’s procedure JsonTextDecodeWithDictionaries to decode the ResponseContent and store it inside the local variable responseDict.
Web1.gotText event is triggered after get or post call to the web app so we need to differentiate between reading sheet data and updating/adding/deleting. Use an if/else block from control to check if the value for key “action” inside responseDict is “read”.
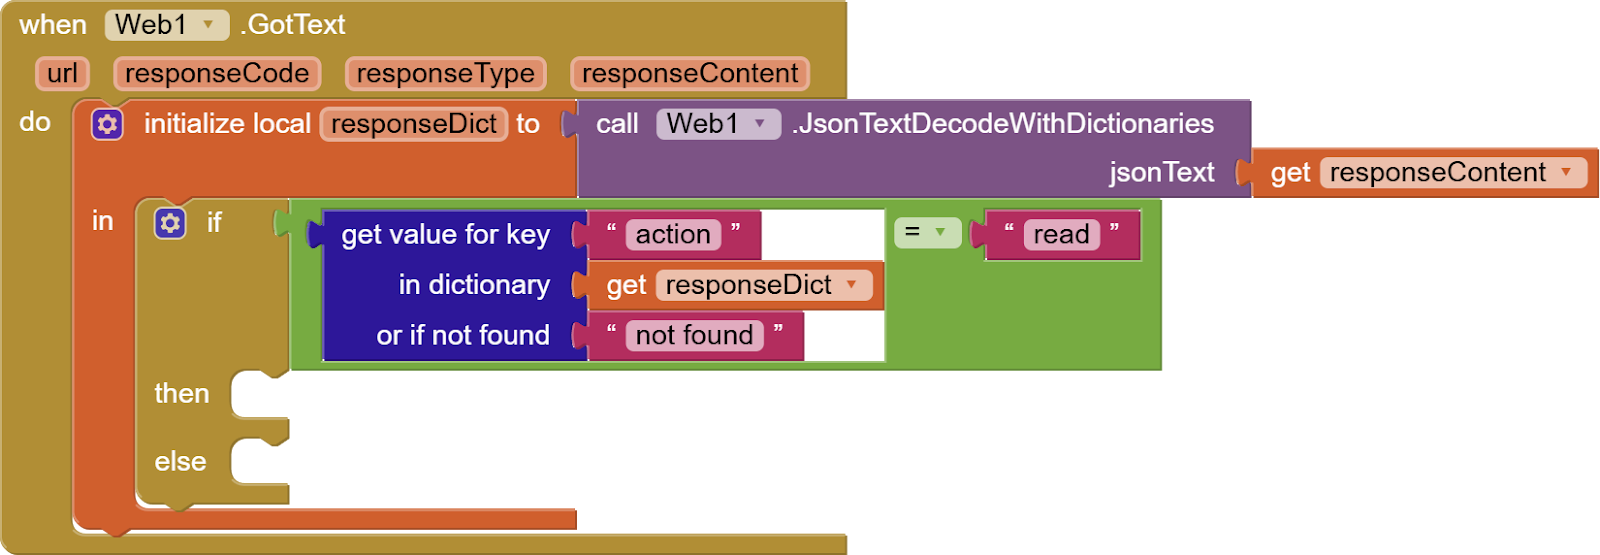
If it is “read” then use a for each item loop from control to go through the value returned against key: “data” inside our responseDict which is actually a list of lists. For each item (row) in this data, get cell data and join it all using “-” to make one long text item and add that item to the sheetData list.
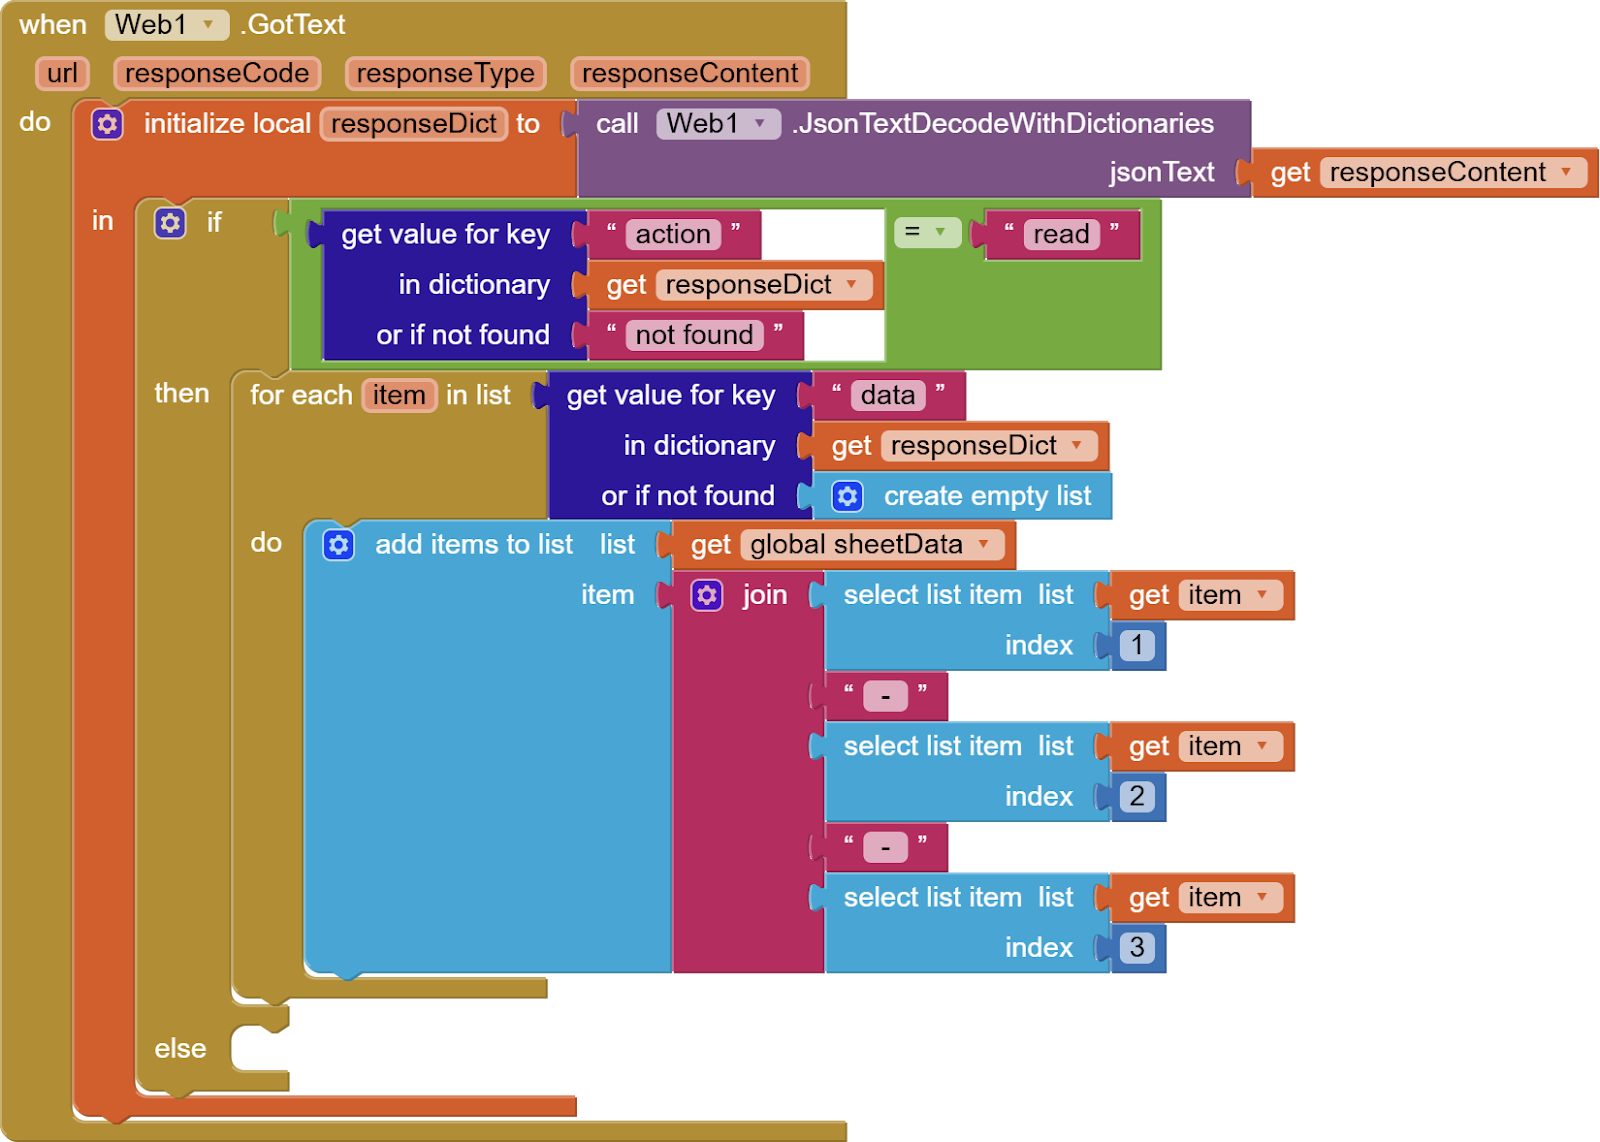
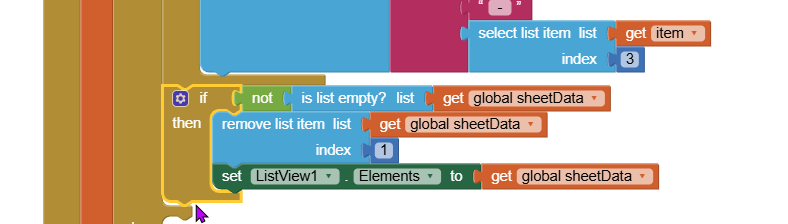
After the for loop, check if sheetData isn’t empty. It will be empty if the sheet is completely blank (not even column names) or if there is some error. If it isn’t empty, remove the first item from SheetData as these are the column names from the sheet i.e. ID, Name, and City. Then, provide this updated SheetData list to the listview’s elements.
At the end of the if/else block, add another if for checking for any message from the web app, and if there is any, use the notifier to show this message. So, our web1.gotText looks like this now:
Try the app now and it should read the sample data from Google spreadsheet and show an error if we provide the wrong sheetName.
Before working on our add, update and delete, let’s look at our web app script again. You can open it again by navigating to Extensions > Apps Script in the spreadsheet menu.
We will call the function doPost from our MIT App Inventor app when we do any kind of updating in our Google sheet.
Hence, you need to edit this if your column numbers in the Google Sheets are different from the ones that I have used.
Let me reiterate:
We have 3 columns: ID, Name, City. When we update, we don’t update the ID, we just update the name and city.
So, let’s look at the script:
In our update, we look for the row in the sheet where the ID is the same as the ID sent by our app. Then, we update the values in the following way:
// Update the name and city
sheet.getRange(i + 1, 2, 1, 2).setValues([[data.name, data.city]]);
This is what each value means:
sheet.getRange(row, column, numRows, numColumns)
This method selects a range of cells in the Google Sheet based on:
- row: The starting row number of the range.
- column: The starting column number of the range.
- numRows: The number of rows in the range.
- numColumns: The number of columns in the range.
Our update starts from the second column so this is why the second value is 2:
sheet.getRange(i + 1, 2, 1, 2).setValues([[data.name, data.city]]);
Our update updates a total of 2 columns i.e. name and city, this is why the last value is also 2.
A different scenario:
If I have a fourth column in my sheet such as age, my code would change to:
sheet.getRange(i + 1, 2, 1, 3).setValues([[data.name, data.city, data.age]]);
We start updating from the second column, updating one row and a total of 3 columns.
If I had a column besides the ID that doesn’t have to be updated. For example, I want to update only city and age so then, my code will change like this:
sheet.getRange(i + 1, 3, 1, 2).setValues([[ data.city, data.age]]);
We start updating from column no. 3, updating one row and a total of two columns.
If you make any changes to the app script, remember to deploy it again.
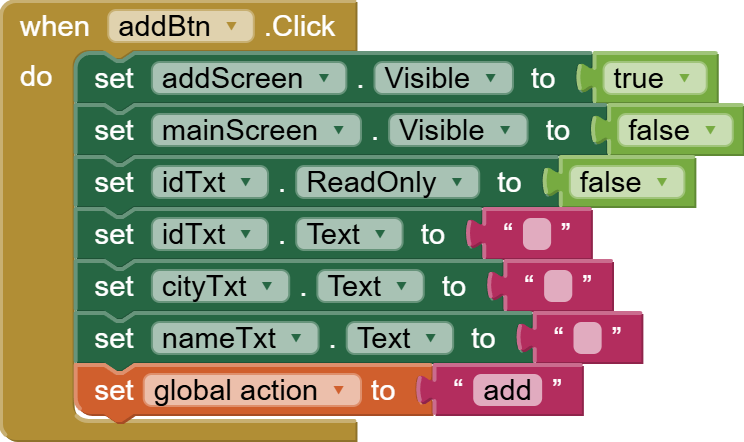
Get addBtn click event. Make mainScreen invisible and addScreen visible. Set action to “add” to differentiate between adding and updating. Also, empty the 3 textboxes so that if we come to this screen again, the old data isn’t there anymore. Moreover, enable the idTxt as we will be disabling it when we use this screen for update.
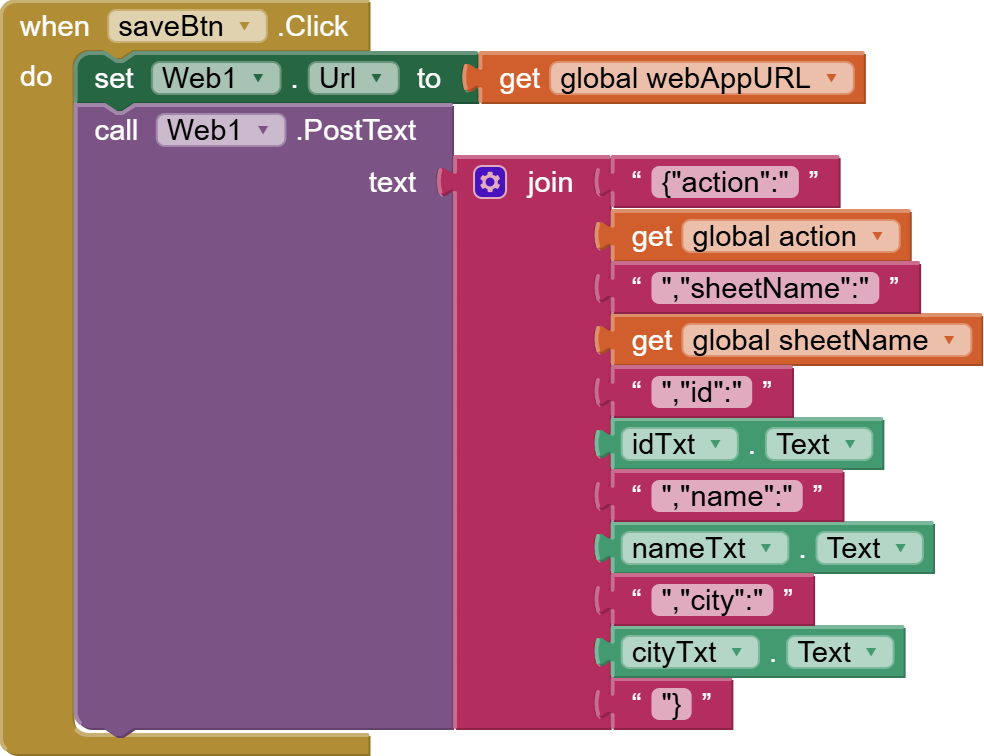
Get saveBtn click event. And set Web1.url to the webURL global variable.

Now, call Web1.postText procedure and we will provide it a join of 11 things that you have to construct very carefully to avoid errors.
- {“action”:”
- getaction block
- “,”sheetName”:”
- getSheetName block
- “,”id”:”
- idTxt.Text
- “,”name”:”
- nameTxt.Text
- “,”city”:”
- cityTxt.Text
- “}
Our final saveBtn click event looks like this:
Now, let’s go back to our Web1.gotText event. The event is triggered whenever we get any response from the Web app after a call such as Web1.get or Web1.postText.
So, it will also be triggered after the save button is clicked.
Click on the cog wheel for the first if/else block in Web1.gotText event, add 4 else if to it, and remove the else.
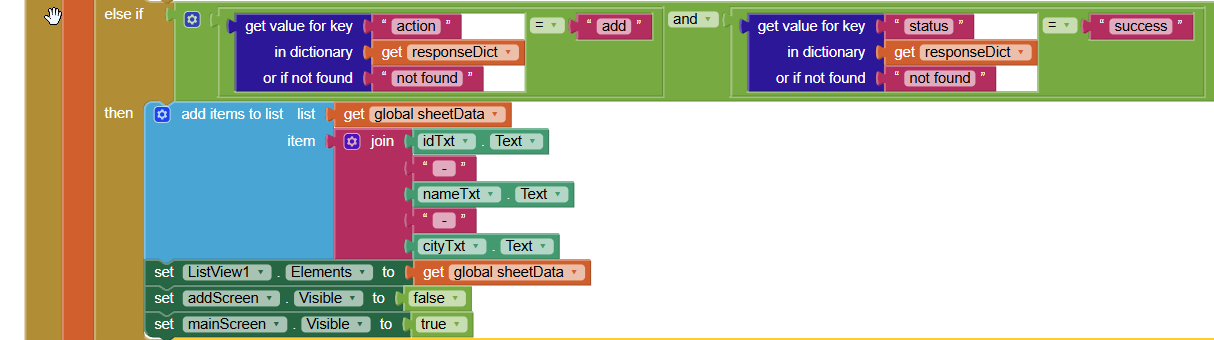
Now, in the first else/if, we will check if our value for the action key is “add” and the status key’s value is “success” in our responseDict.

This means the add was successful, so we will add the item to our sheetData, update our list view’s elements, hide addScreen, and make mainScreen visible..
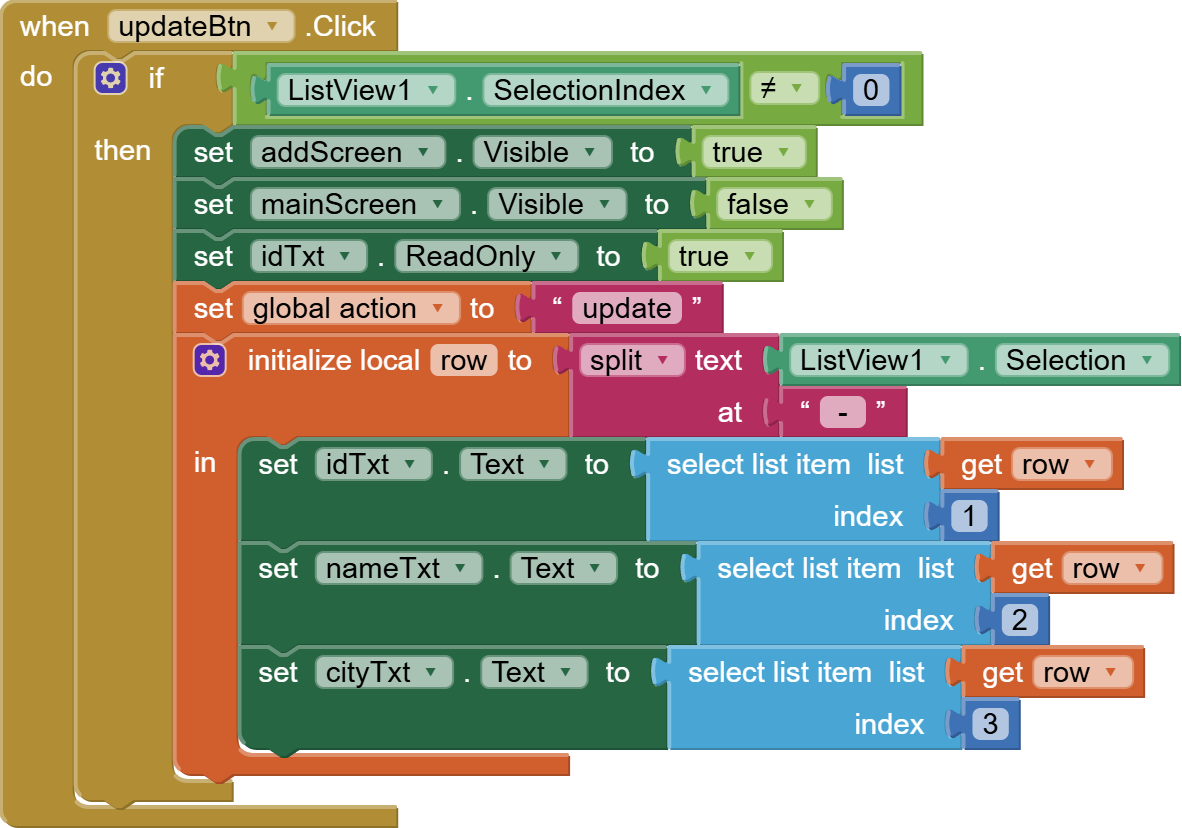
Now, let’s work on updateBtn click event. In this case, we have to first check that the user did select an item on Listview before pressing update button. If he did choose then the selection index will not be 0. After that make the update screen visible while hiding the mains screen. Disable the idTxt so that the user isn’t able to update the id and set the action variable to “update” so that our web app can differentiate. And most importantly, populate all the text boxes with the selected item’s data. Remember that we had joined everything with “ – “ so have to split the text using it to get all individual cell items back.
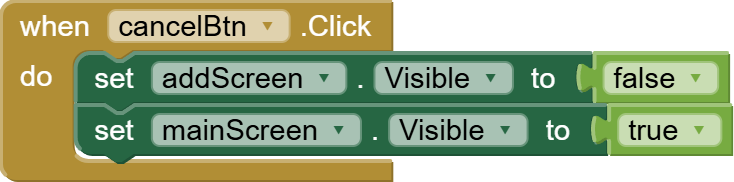
The save button code will stay the same but remember the cancel button. If the user cancels, just go back to the previous state of hiding addScreen and showing the main Screen.
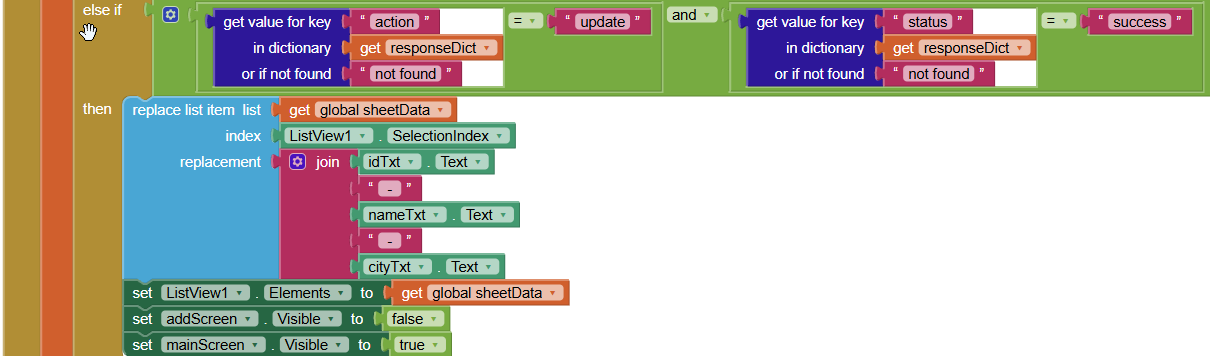
In our web1.gotText event, let’s handle the update scenario.
For the next else if, do the following. Here, instead of adding to SheetData, we just replace it with updated data.
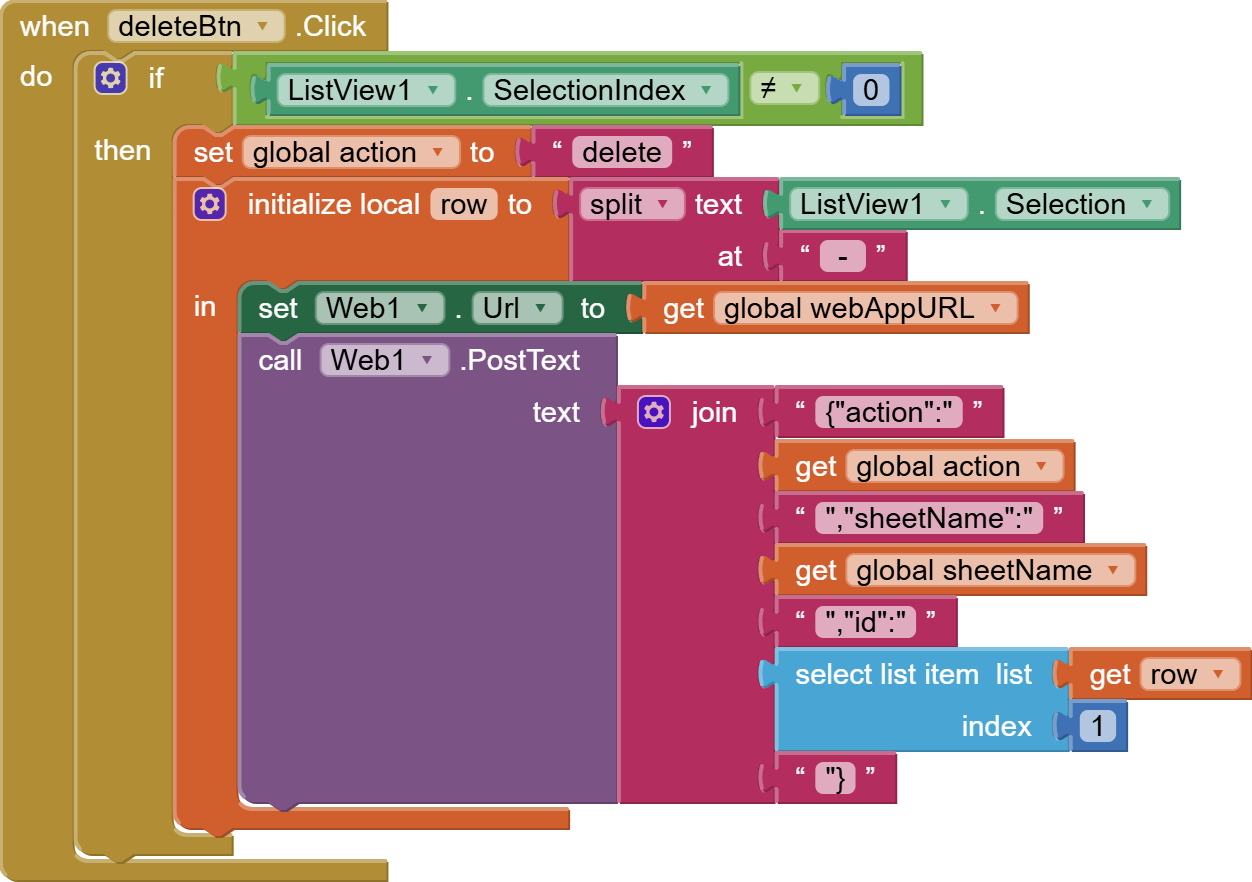
Now, let’s come to the delete button click event.
Again, we need to check that something was selected from the listview before pressing the delete button. We set the action to “delete” to inform our web app and we also again get individual cell items back and we call Web1.postText but this time we don’t send the name and city but just the ID.
In our web1.gotText event, let’s handle the delete scenario.
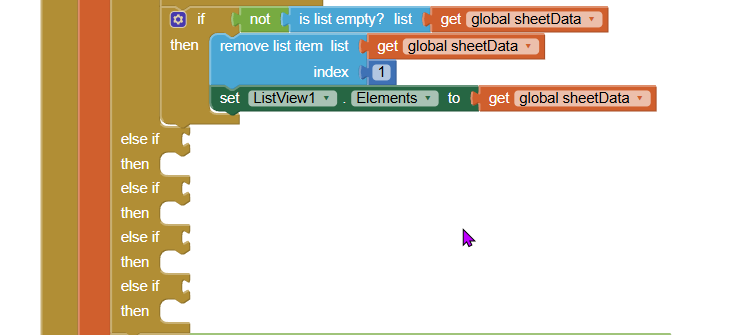
For the next else if, do the following i.e. delete the data for selection index from sheetData and update listview’s elements.

The last else if is for the situation when there is any error:
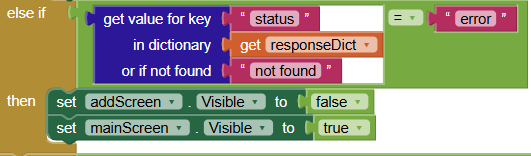
In this situation, just make the default mainScreen visible and hide addScreen.
So, our final Web1.gotText event looks like this:
By the way, while making this tutorial, I thought that I should cover automatic ID generations similar to SQL databases to avoid duplication of IDs. If you are interested, do comment to let me know.
So, this is done. You can check out the two video tutorials for updating and deleting google sheets in MIT App Inventor below:
If you like my tutorials, consider supporting me:

Don’t forget to subscribe to my channel if you like my work so that you don’t miss the great projects that I have planned for you. Thank you for watching. Have a good day and goodbye.
Check out my other written tutorials for MIT App Inventor here.
Please like my social media pages for more educational resources and tips.
Facebook: https://www.facebook.com/ObsidianSoftClasses
Instagram: https://www.instagram.com/obsidiansoftapps/
Pinterest:
For links to free educational apps, have a look at the educational apps page