Hello friends,
Welcome to Obsidian Soft.
Today, we will make the very popular Hangman game in MIT App Inventor.
Let’s begin.
We need a few images for our hangman. The images have to be in a sequence and have to be the same size. You can draw yourself too. But if you are bad at drawing like me 😀, then you can download them from here.
https://commons.wikimedia.org/wiki/File:Hangman-0.png. Right-click on the image and save it to your computer. Then, change the 0 to 1 in the URL and save the Hangman 1 image, and continue doing so until you reach Hangman 6.
We also need a few sound effects. I got these sound effects from Pixabay.
https://pixabay.com/sound-effects/winner-game-sound-404167
https://pixabay.com/sound-effects/violin-lose-4-185125
Now, open up MIT App Inventor. Start a new project and call it Hangman.
First of all, upload the seven images and 2 sound effects in the media section by selecting all of them and dragging them to the media section.
In screen1’s properties, make the screen orientation portrait.
Drag and drop a vertical arrangement from the layouts palette onto the viewer.
Make the background color yellow, align horizontal center, and height and width both fill parent.
Drag and drop an image component from the user interface palette inside this arrangement. Rename it to hangmanImg. Make the picture the 0 image of the hangman image series and change the height to 25%.
Drag and drop a label below this image. Rename it to wordLbl. Make the font bold, font size 50 and change text to a few dashes—-. The actual number of dashes will be decided based on the word, so these dashes are just a placeholder.
Now, we need a few horizontal arrangements for our alphabet buttons.
Drag and drop a horizontal arrangement from the layouts palette below the wordLbl.
Make align horizontal and align vertical both center. Make height 10% and width fill parent.
Drag and drop a button inside this horizontal arrangement from the user interface palette. Rename it to aBtn. Make background color a custom light blue, font bold, font size 25, width 15 %, shape rounded, and text = A. Drag and drop a label for spacing on the right of this button. Remove all text from it and make the width 1%. Duplicate this space label by selecting it and pressing Ctrl + C & Ctrl + V on the keyboard for Windows OR Command + C & Command + V for MacOS. Put it on the left of the aBtn. Now, duplicate aBtn. Rename to bBtn and change the text accordingly to B. Duplicate a space label and place it between the a and b buttons. Keep on doing the same thing for the first 6 buttons. The last button F will be a little tricky, so temporarily make its width 5% to put space on the right of fBtn and then make it 15% again.
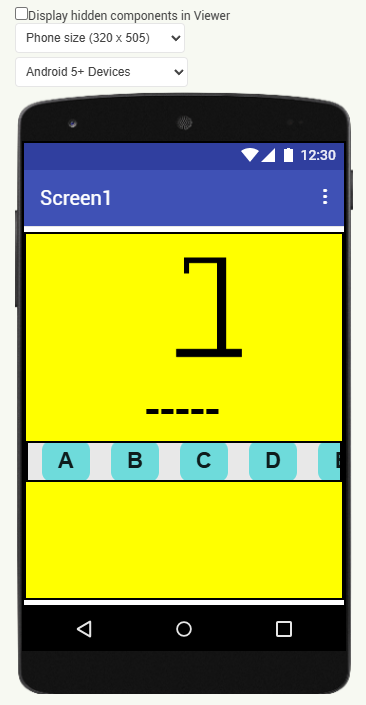
After the first row of buttons, your screen should look like this:
Now, select the entire horizontal arrangement and duplicate it. Rename buttons to gBtn, hBtn, iBtn, jBtn, kBtn, and lBtn, and respectively change the text to G, H, I, J, K, and L.
Duplicate arrangement again for letters M, N, O, P, Q, R, and then again for S, T, U, V, W, X. Phew! I remember making the calculator app a few years ago, and the duplicate option wasn’t available then!
Duplicate one more time. This time, remove all buttons except 2 (for X and Y) and a space label in between them. Select this arrangement and duplicate it.
We need a status label and a restart button here. So duplicate label. Rename it to statusLbl. Make font bold and font size 20. Change text to “Guess a letter!”. Remove the extra button. Rename the remaining button to restartBtn. Make font bold, font size 18, make width automatic, and change text to “Restart”. Verify that all buttons have the correct letters on them. It is super important as the text on them will be used in code. Lastly, add a clock from sensors. And uncheck the timer enabled and timer always fires checkboxes. And make time interval: 3000. This is for adding a short delay before displaying a new hangman word.
Now, add two sound components from the media palette. Rename one to winSound with source set to the win sound effect. Rename the other one, loseSound, with the source set appropriately to the lose sound effect.
The UX design is done, so let’s go to the blocks section.
We need a few global variables.
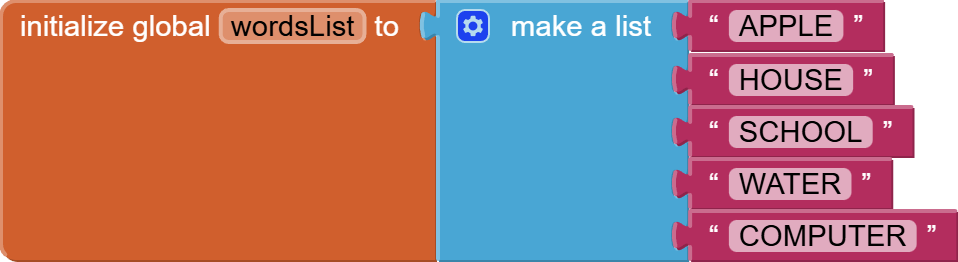
A master word list for containing the words of the game. For the sake of simplicity, I am hard-coding the words inside the game. You can store your words in a Google Sheet or Firebase DB and load them too. I have done multiple tutorials on Sheets and Firebase DB.
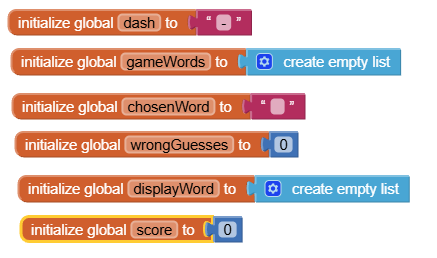
The other global variables are for the dash “-”, the list of game words, the word chosen for one session of the game, the number of wrong guesses made so far, the word actually being displayed on the screen, which is actually a list of letters, and the score.
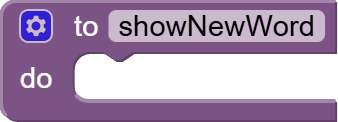
From procedures, get the first type of procedure and rename it to showNewWord.
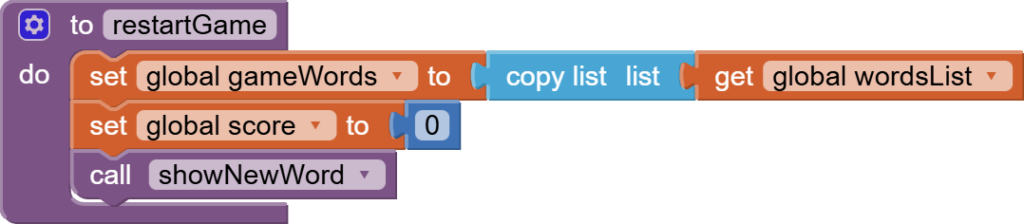
Then, make a procedure for restarting the game where we first copy the master words list into our gameWords list. Then, we reset the score to 0, and we also call the showNewWord procedure. Make sure to use the copy block for copying the master words list.
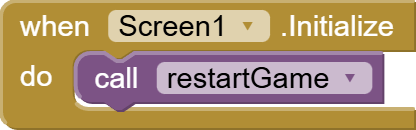
We call the restartGame procedure when the screen is initialized.
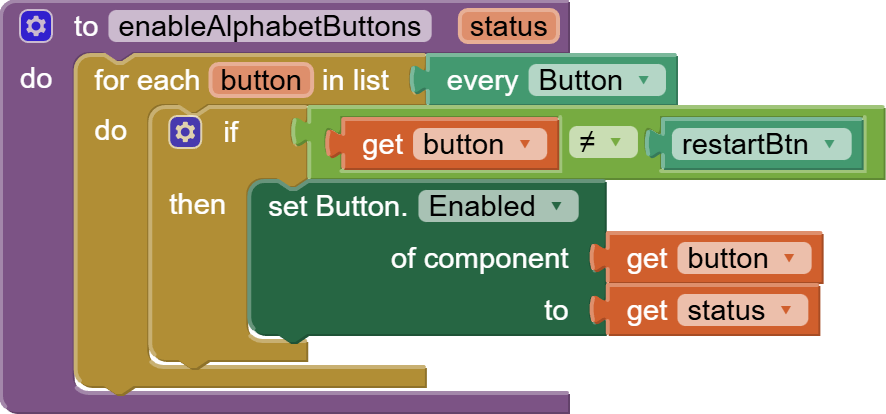
Then, we make a helper procedure for enabling and disabling the alphabet buttons. The alphabet buttons are all buttons except the restartBtn. We can get the list of buttons by using any component blocks.

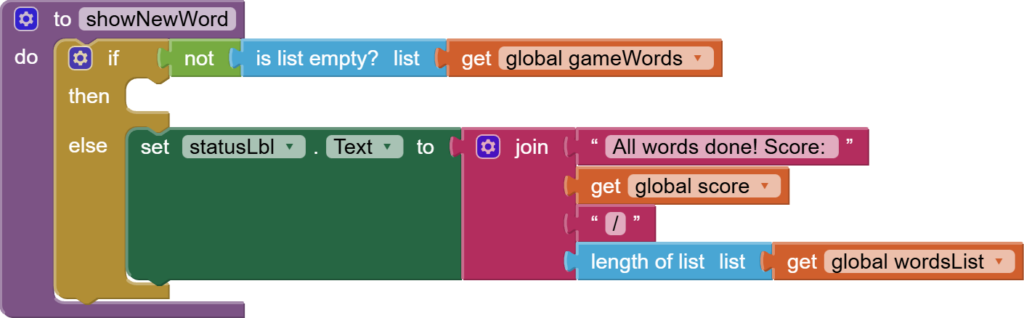
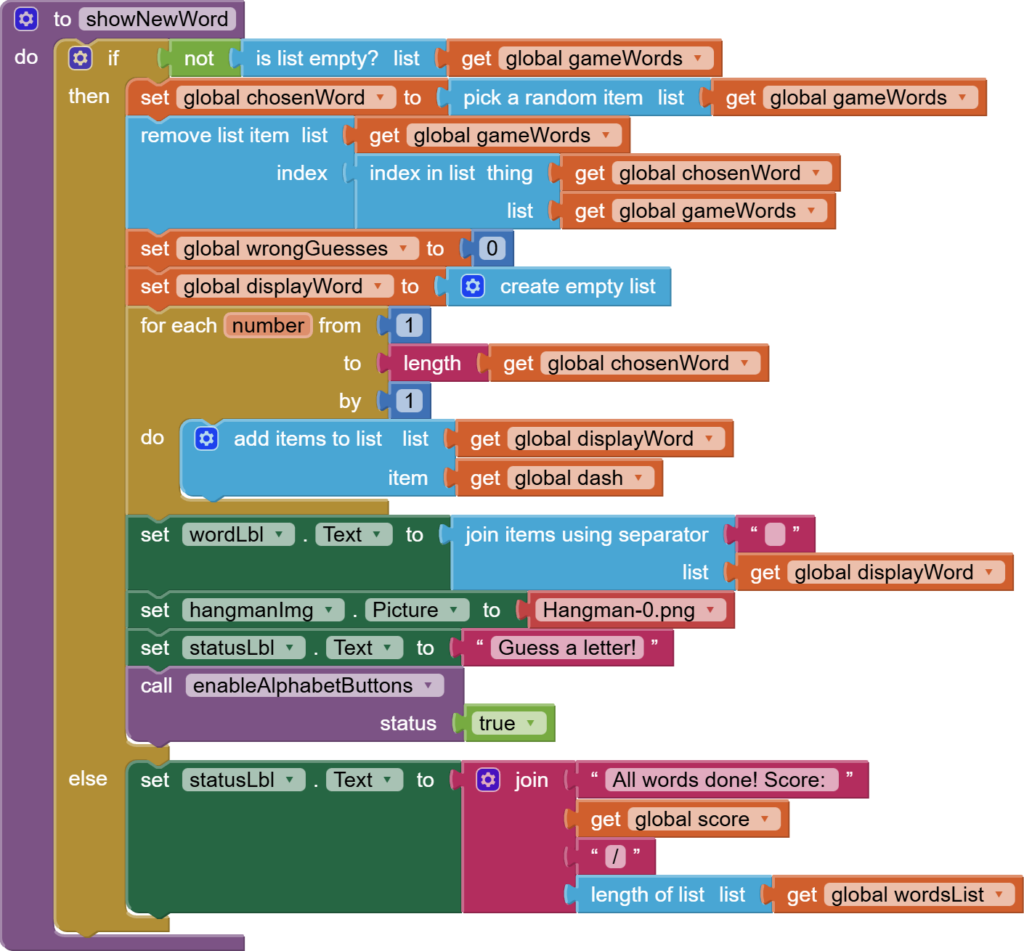
The job of the showNewWord procedure is to set up the screen for the new word. It is a bit long, but I will explain everything while we build it.
First, we check that we still have remaining words in our gameWords list using a control if/else block. Else means that we have used up all the words in our game words list and the game is over, so we update the statusLbl accordingly with the score.
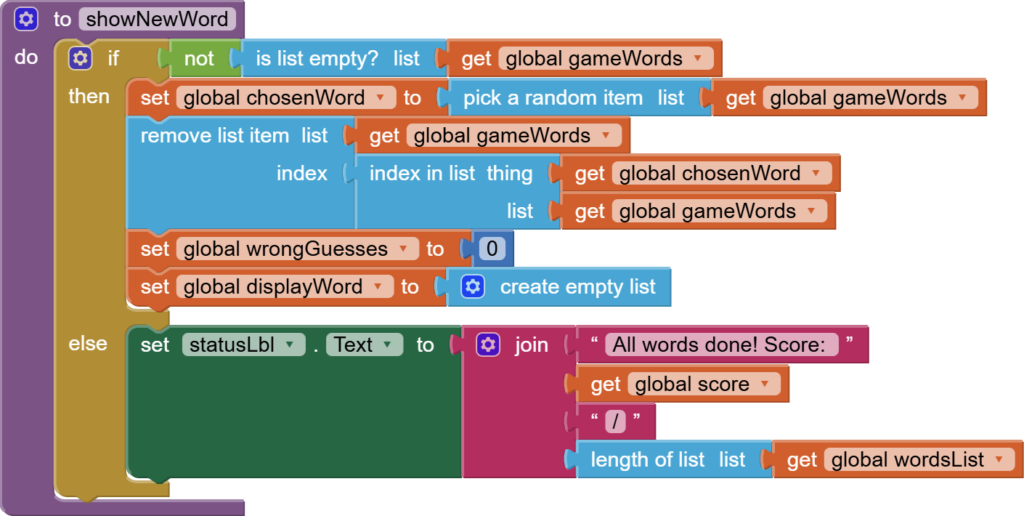
In the if block, the game is still continuing as we still have words left in the gameWords list. We pick a random word from the game words list and set it to chosenWord. And we also remove that chosen word from the gameWords list so that it doesn’t come again in that session of the game. This is the reason why we used the copy block for copying the master list. If we hadn’t, the word would have been removed from our master words list, too. We reset wrong guesses to 0 and make the display Word an empty list.
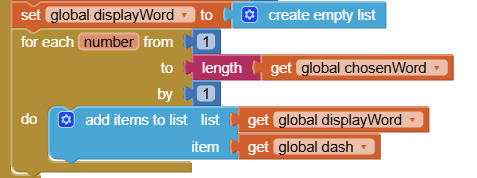
Then, we need to run a for loop to add dashes to our display word.
Then, we set our wordLbl on the screen to join all the letters in the list of displayWord.

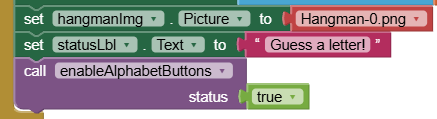
Then, we reset our hangman image to the 0.png image. We reset statusLbl to “Guess a letter!” and we enable all our alphabet buttons using our custom procedure.
So the final showNewWord procedure looks like this:
Now, make an empty procedure for what should happen when an alphabet key is pressed.
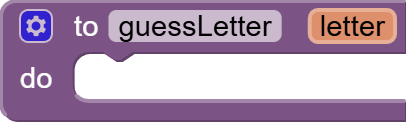
But how do we know that an alphabet key has been pressed.
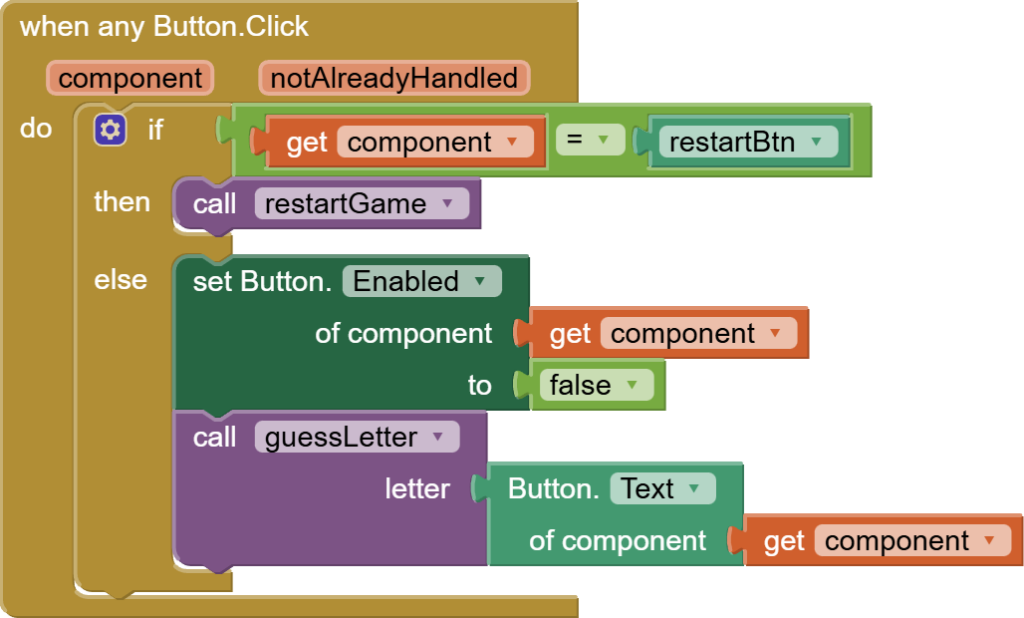
We can use Any component -> Any button -> When any button click event.
We check if the component (button clicked) is the restartBtn. In that case, we call the restartGame procedure. Otherwise, it means it is an alphabet button, so first we disable it so that the user can know he has already used that button, and then we call the guessLetter procedure with the text on the button being the input. This is why I said earlier that the text on the alphabet buttons is very important.
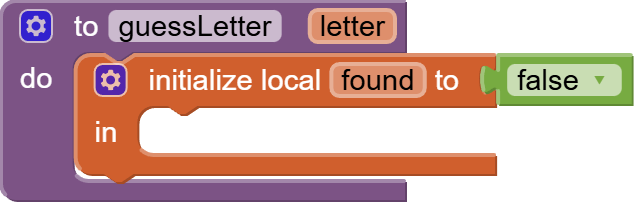
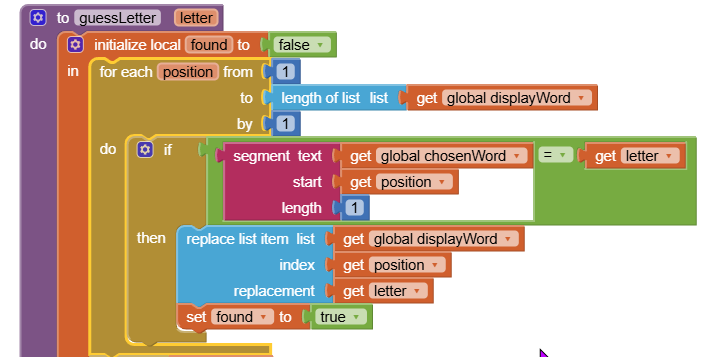
Now, we work on our main game logic block, i.e., the guessLetter procedure. We make a local variable called found and initialize it to false.
We run a for loop where the number of times the for loop is run is equal to the length of our displayWord, and we check if the letter is a segment in our chosenWord. Use the segment block from text very carefully. If we find the letter at a position, we replace the dash in the display word at that position with the letter, and we also set found = true because our guess has been correct. We are using a for loop here so that we can update repeating letters. For example, if the user presses “P” for the word “APPLE”, two Ps will be put at their correct positions.
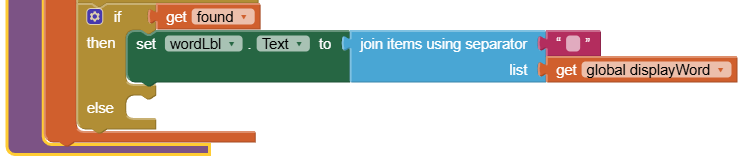
After the for loop ends, we use an if-else block to differentiate between a correct guess and a wrong guess, and in case of a correct guess, we update the wordLbl on the screen too.
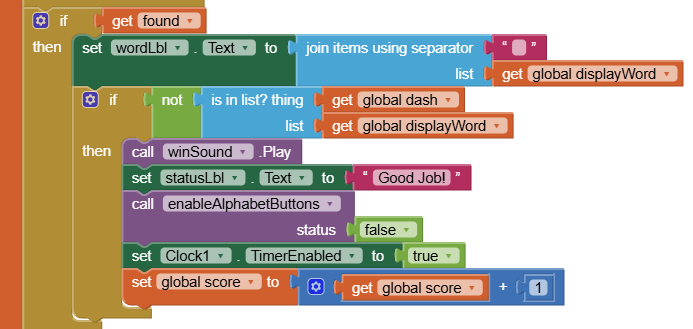
In the if condition, there is a chance that we have guessed all the letters in the word, so we use another if block to check if there are no dashes in the display word, and if there are none, we play a win sound. We update statusLbl, disable the alphabet buttons temporarily, increment score (add a 1 to it), and enable our 3-second timer.
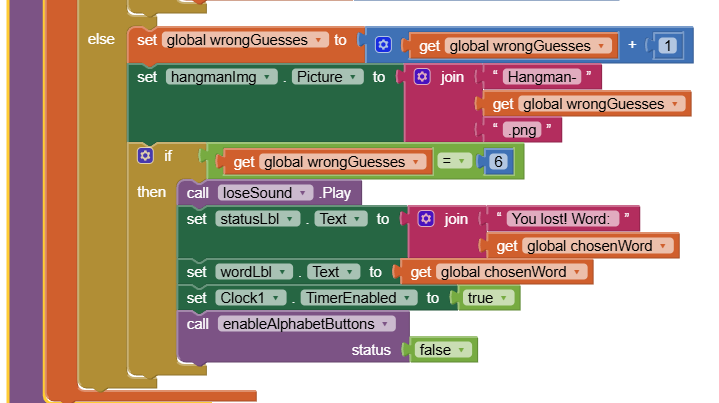
Otherwise, we increment the number of wrong guesses, and we use it to construct our hangmanImg. We also check for the loss condition, i.e., all guesses used (6). In that situation, we play the loseSound. We update statusLbl. We show the correct word in the wordLbl, enable the 3-second timer, and disable the alphabet buttons temporarily.
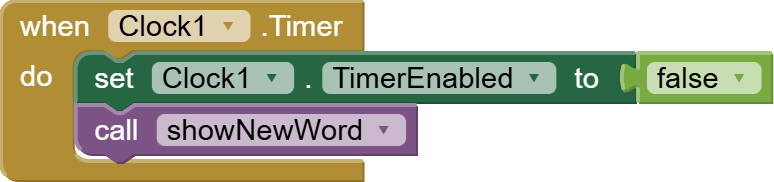
Last is the 3-second timer event. Here we will first disable the timer and call the showNewWord procedure.
So, this is done. I hope you like the tutorial.
You can also get the AIA Project file from here:
Get the AIA File for Hangman Game
You can also check out the video tutorial for this project on my channel.
Part 1:
Please like my tutorials and share it with your friends and family. Also, subscribe to my channel and press the bell icon so you don’t miss any of the great projects I have planned for you.
https://www.youtube.com/c/obsidiansofteducation
Please like my Facebook page and Instagram page for more educational resources and tips.
Facebook: https://www.facebook.com/ObsidianSoft/
Instagram: https://www.instagram.com/obsidiansoftapps/
Pinterest: https://www.pinterest.com/obsidiansoft/
For links to free educational apps, have a look at the educational apps page