Hello friends, and welcome to Obsidian Soft
In today’s tutorial, we will make a multiple-choice quiz app where people have to choose the correct name for the landmarks shown. Let’s get started. Open up MIT App Inventor. Start a new project. Let’s call it LandmarksQuizApp. No white spaces in the project name.
First, we will make the front-end or screen design.
Screen 1 will be the menu screen with just one button on it.
Optionally upload a background image in the media section. I got one from https://www.freepik.com/vectors/wonders-world
In screen1’s properties, make align horizontal center and align vertical center. We will need this to correctly align our start quiz button. Choose the uploaded background image as the background. Change the title text to Guess the Landmarks! Make the screen orientation landscape.
Now we just need a button to start the quiz. So drag and drop a button from the user interface palette. Make the font bold. Font size 20. Height 20% width 60%. Make it rounded. Change the color to black. Make font color white. Change text to “Start Quiz”. We are done with this screen. So let’s add another screen, i.e., our main quiz screen. Click on add screen. Name it QuizScreen…no white spaces here, too.
Make this screen’s orientation also landscape. Hide title bar.
In the screen’s properties, make align horizontal and align vertical both center.
I found this cool white brick background:
https://www.vecteezy.com/vector-art/135628-white-brick-pattern-background. You can download it, upload it to the media section, and set it as the background for the quiz screen.
Drag and drop a horizontal arrangement from the layouts palette onto the viewer. Rename it to resultSection. Make align horizontal center, align vertical both center. Make background: none. Make the width fill parent and height: 15%. Select it and duplicate by pressing Ctrl + C & Ctrl + V on the keyboard for Windows and Command + C & Command + V for MacOS. Rename it to questionSection and change the height to 45%. Duplicate this section and rename the new section to answerSection with height 20%. Duplicate again. Rename to buttonSection with height 15%.
Drag and drop a label from the user interface palette inside the resultSection. Name it result. In its properties, make font bold, font size 20, and set text: What is the name of this landmark? Make its text alignment center. We will change it to correct or wrong once the user answers something.
Add an image component from the user interface palette to the questionSection. Name it landmarkPic. Make its width: fill parent. It will automatically be scaled to fit this particular arrangement of questionSection.
Let’s add a few landmark images to our project’s media section. You can select them all and drag them to the media section and drop them when the green dashed rectangle shows. I got images from https://www.kids-world-travel-guide.com/top-10-famous-landmarks.html
Let’s work on our answerSection. Add three checkboxes. Make their width 33%. Font size: 20 and font: bold. All checkboxes should be enabled.
In the last section, add two buttons. Font size: 20 and bold. Width is 30%. Shape is rounded. Color is black with text white. One is a submit button that the user will press after checking a checkbox. Add an empty label (no text in it) of 10% between them to give space (trick), and the other is the next button for going to the next question. Rename the text on them and the button name appropriately. I will also be teaching how to give the radio button feature in MIT App Inventor. These checkboxes will behave like radio buttons, i.e., only one can be checked at the same time.
You can also upload some sound effects in the media section. I got correct and wrong sounds from Pixabay:
Sounds:
Correct sound:
https://pixabay.com/sound-effects/search/correct
Wrong buzzer sound:
https://pixabay.com/sound-effects/search/Wrong
So, add a sound component from the media palette. Rename it to correctSound and use the correct sound MP3 file as the source. Select it and duplicate it. Rename it to wrongSound and change the source accordingly to the uploaded wrong sound effect.
Also, add a notifier from the user interface palette. We need to give a message to the user if they press the submit button without choosing an answer.
We are done with our front-end.
Now let’s work on the blocks.
Go to the blocks section. Choose screen1. Very simple code for it. When the start quiz button is clicked, go to QuizScreen. You can get the open another screen block from the control section.

Now let’s work on the QuizScreen.
To add a multiple-choice feature to our app, we need three lists. One list will contain the image file names. The other will have the answer corresponding to those images. And the third list will have a list of three choices for each landmark image.
Use a global variable. Name it landmarksList. Add a list to it with three items. You can click on the dark blue cogwheel to add more slots to any block.

Click on the landmarkPic on the left (the image component). In its blocks, go down, and at the very end, there will be a media block in orange color. Drag and plug it into the first slot of the landmarksList and choose the Taj Mahal image file name. Right-click on the Taj Mahal media block and duplicate it. Plug it into the second slot in the landmarksList and choose the Sphinx image file. Duplicate this block and plug it into the third slot, and choose the Eiffel Tower image file.
Right-click on the landmarksList and duplicate it. Rename it to answersList. Now, instead of media blocks, we need to add text blocks with the names of the landmarks in the order in which we have added them to the landmarksList.

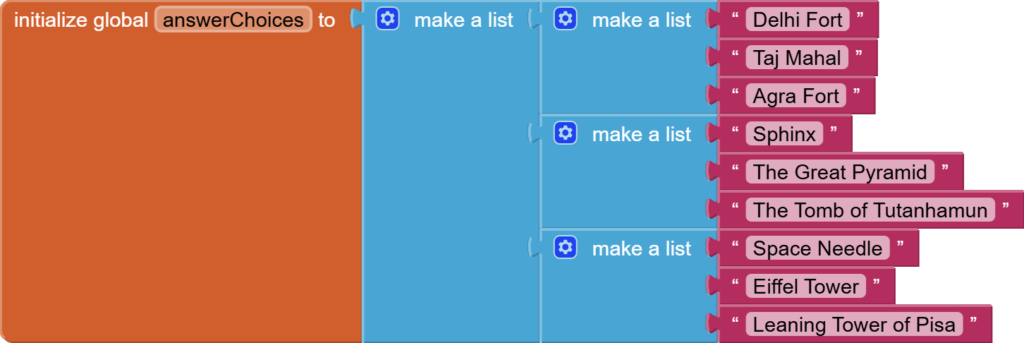
The third and final list is actually a list of lists. It is a list with 3 slots, and each slot is a list too, with 3 text blocks containing the answer choices. Make sure that each item in the answerChoices list has one answer choice 100% the same as the one in the answersList. And the order should be the same. For example, since we are showing the Taj Mahal picture first, the answer should be Taj Mahal, and the answer choices should have Taj Mahal in them too (it is better to duplicate and use the block from the answersList to avoid spelling mistakes)
Perfect. Now add a variable that has the current question number in it. Make it 1.

Add two more global variables for answer and score.

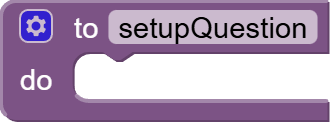
Make an empty procedure (first type) for setting up the question.
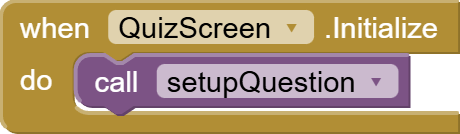
Now, when the screen is initialized, we want to show the first landmark on the list, so get the QuizScreen initialize event and call the procedure setupQuestion. Don’t worry. We will put together the code for it next.
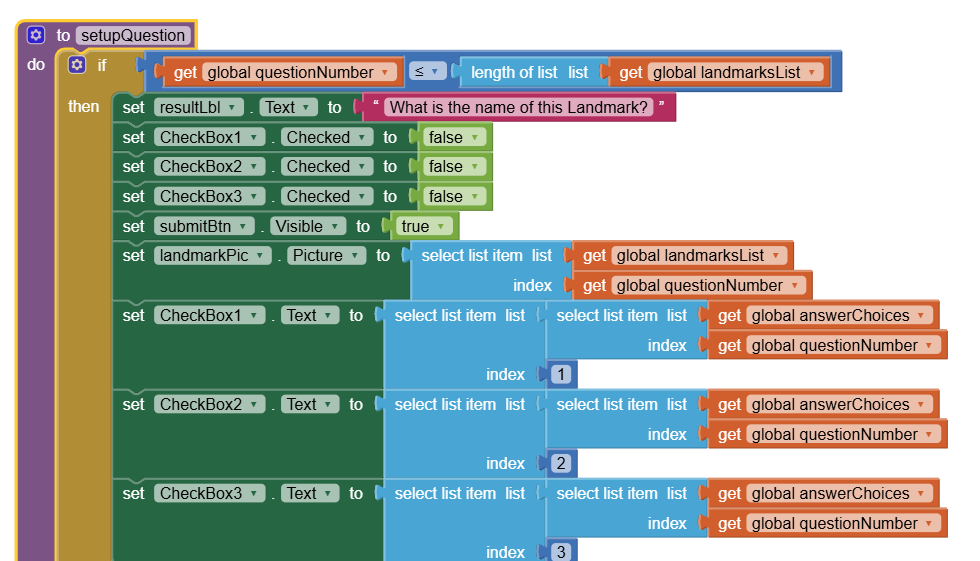
Now, we come to the setupQuestion procedure where we will first plug in an if/else block from control. This is for checking if we still have questions left to be shown to the user (for this, the question number count should be less than or equal to the total number of images in the landmarksList)

If the if condition is true, i.e., we still have questions left, we are going to first set resultLbl text to the main question, i.e., What is the name of this landmark? We will make all checkboxes false so that they are unchecked. We will make the submit button visible. And we will update the question details, such as the image and checkbox texts, according to the question number.
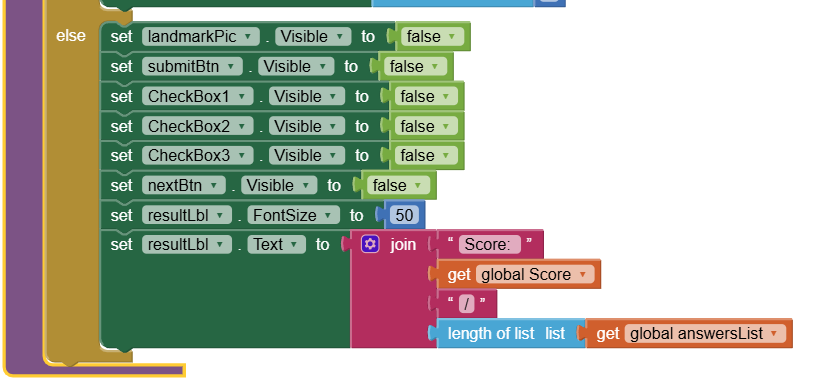
In the else block, this means the quiz is over, we will make everything invisible except the resultLbl, and just show the score in it.
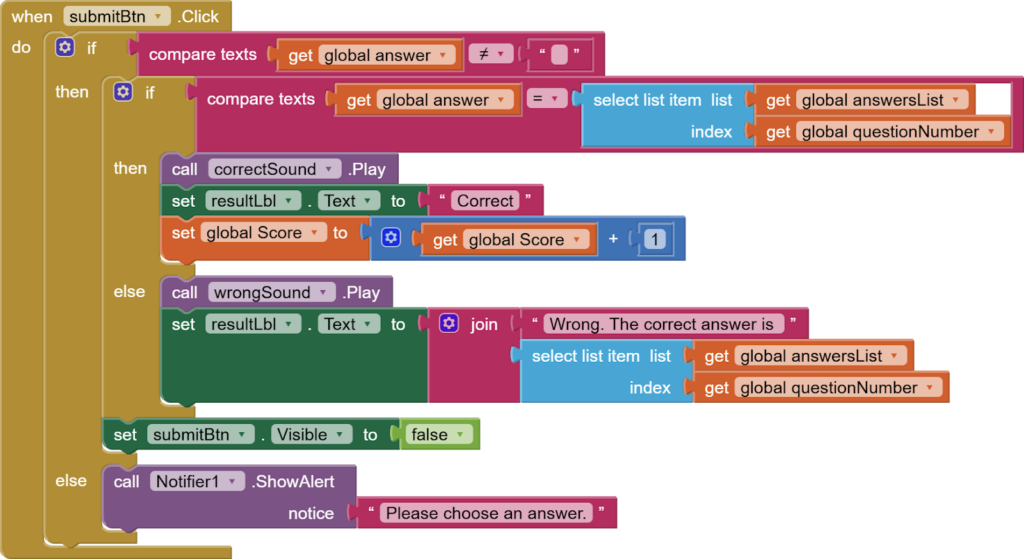
Now, let’s add some code when the user chooses the answer and clicks on the submit button. So we will use the submitButton.Click block. Now, we have to compare the answer given by the user with the actual answer for that landmark by looking at our answer list. But only check if there is some value inside the answer; otherwise, show an error message using the notifier. Also, play the correct sound if the answer is correct.
Now, let’s work on our checkboxes.
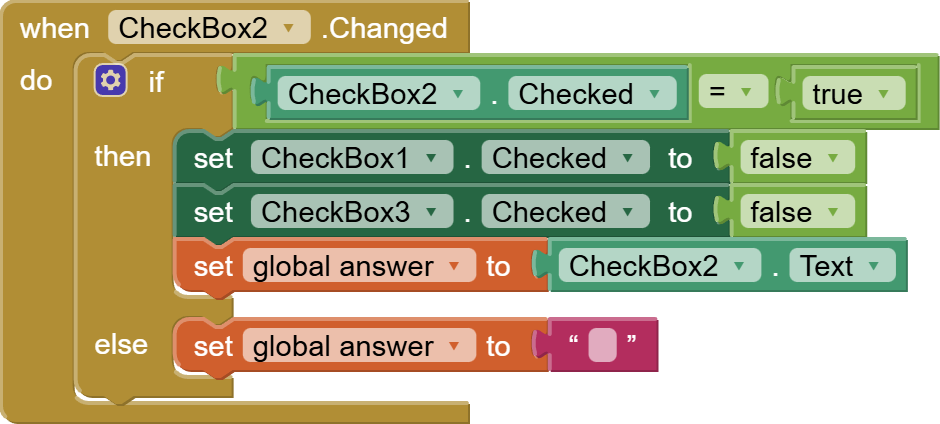
For all checkboxes, add this code which, in case they are checked, fills up the answer variable and unchecks everything else. Otherwise, it makes the answer empty. The order is very important.


Last but not least, add code for the next button where we add a 1 to our questionNumber count and then, call setupQuestion procedure for updating the screen with the next question.

So, this is done. I hope you like the tutorial.
You can also get the AIA Project file from here:
Multiple Choice Quiz App AIA File
You can also check out the video tutorial for this project on my channel.
Part 1:
Part 2:
Please like my tutorials and share it with your friends and family. Also, subscribe to my channel and press the bell icon so you don’t miss any of the great projects I have planned for you.
https://www.youtube.com/c/obsidiansofteducation
Please like my Facebook page and Instagram page for more educational resources and tips.
Facebook: https://www.facebook.com/ObsidianSoft/
Instagram: https://www.instagram.com/obsidiansoftapps/
Pinterest: https://www.pinterest.com/obsidiansoft/
For links to free educational apps, have a look at the educational apps page