Hello friends
Welcome to Obsidian Soft.
Today, I will teach you how to make the iconic flappy bird game in MIT App Inventor.
So, let’s begin.
First, let’s get bird flying animation images. Visit the following link.
https://opengameart.org/content/bevouliin-green-flappy-bird-sprite-sheets
Download the zip file. Unzip it and you will see flying image frames numbered from 1-8 in the flying folder.
We also need two pipe images. Search on Google and you can find many for e.g. https://toppng.com/free-image/mobile-flappy-bird-version-12-sprites-the-spritersthe-tubo-de-mario-bros-PNG-free-PNG-Images_175440
I made a copy of the pipe bottom image and rotated it twice to get the pipe top image too.
You can even draw green rectangles with 100 pixels length and 40 pixels width
Now, open up MIT App Inventor. Start a new project and call it FlappyBirdGame.
Drag and drop all bird and pipe images into the media section. For screen1’s properties, make screen orientation landscape and also turn off the title visible checkbox.
Drag and drop a canvas from Drawing and Animation onto the viewer. Give a custom light blue background color to the canvas. Make the width fill parent and height 80% in its properties. Make paint color red and font size 50.
Drag and drop an image sprite from Drawing and Animation onto this canvas. Rename to birdSprite. Make the picture frame-1. I am also going to give it a custom size of 49 pixels height and 50 pixels width as I felt that the original bird image was too large for the game. This height width maintains the aspect ratio of the original image.
Add two more image sprites and rename them pipeBotSprite and pipeTopSprite respectively with appropriate images. I will also give them a custom height and width of 70 pixels and 40 pixels respectively. We will change the height in the code to give that random factor to the game.
We need a clock sensor for controlling the game loop i.e. the pipes’ movement and the bird falling due to gravity.
So, add it, rename it to gameClock, and make its interval 20 ms. You can start with 30 ms if you plan to add levels to this game and change this interval to 20ms i.e. make it faster for advanced levels. Turn off the timer always fires checkboxes.
Add another clock sensor from the Sensors Palette. Rename it to animClock. Make the timer interval 50 milliseconds and uncheck timeralwaysfires checkbox.
Add a horizontal arrangement below the canvas. Make align horizontal and align vertical both center. Make height 15% and width fill parent. Make the background color yellow. Add a button from the user interface palette to this arrangement. Rename it to resetBtn. I am going to make it cyan. Font size 18, font bold, and change the text to Reset. Add a label too. Rename it to scoreLbl. Make font bold, font size 18, and change text to Score: 0
Our screen design is done so let’s go to the blocks section.
Make a global variable birdFrame and make it 1.

Make another global variable gameOver and make it false.

We also need a score variable set to 0.

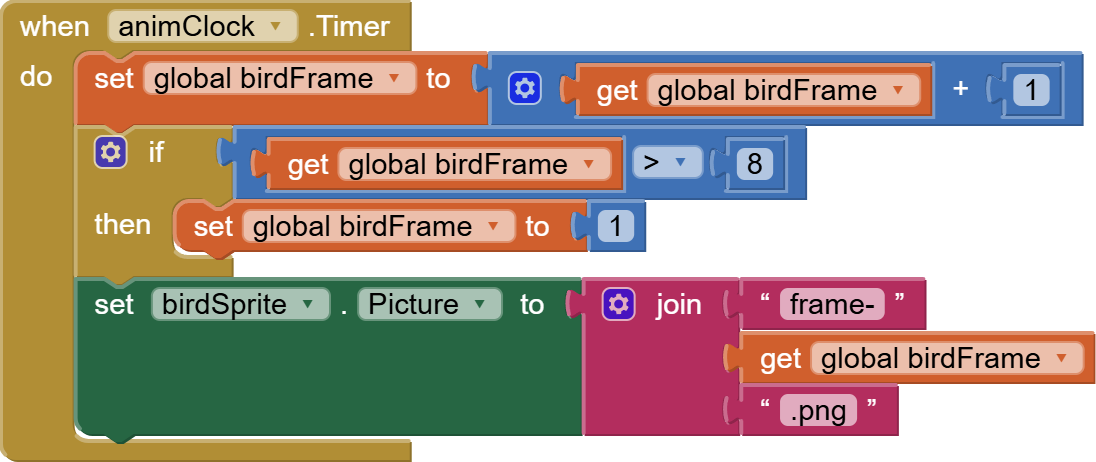
Get the animClock timer event for animating the bird. We increment birdFrame by 1. We check if it is greater than 6 as this means that we have showed all the bird frames and we should reset it to 1.
And then we use this frame number to construct the image name and give it to the birdSprite’s picture.
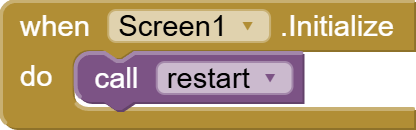
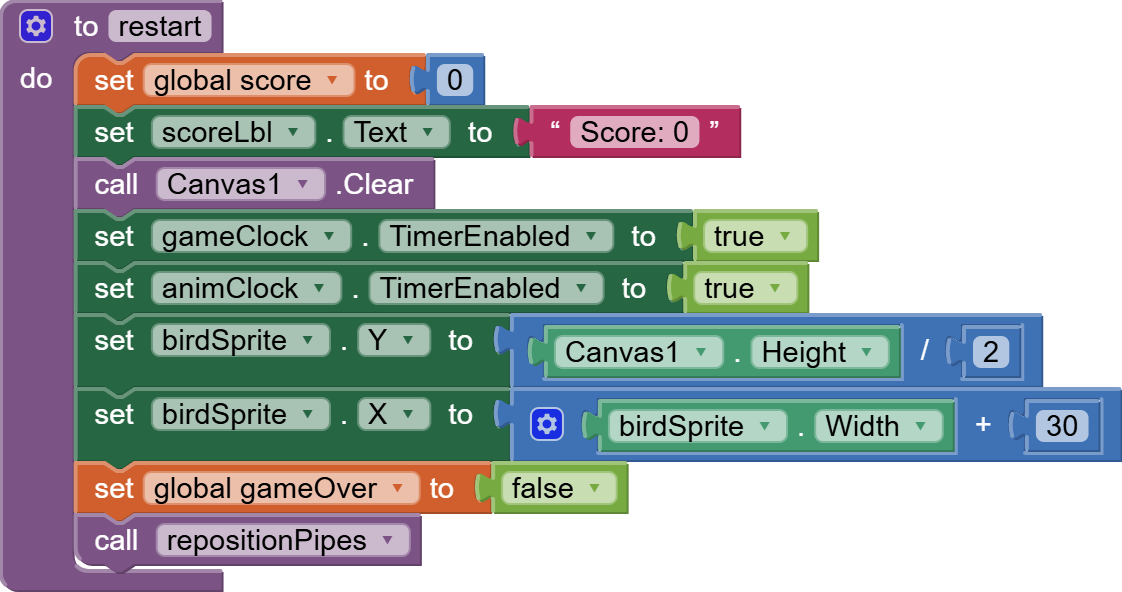
In our screen initialize event, we call a procedure called reset that will take care of resetting everything on the screen. Why are we making a procedure for this? Procedures are excellent ways of reusing code and we need to use the reset code in the reset button too.
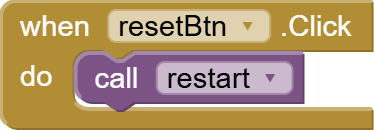
The reset procedure will also be called from the reset button click event.
Now, let’s put together some code for our reset procedure. We reset the score to 0. We update the score lbl to reflect this change. Clear the canvas to remove the game-over message. We enable our two timers as we will be disabling them in the game over event. We give a good position to the bird on the left of the screen horizontally and middle of the screen vertically. We set gameOver to false. And we call a procedure repositionPipes that will be responsible for giving random heights to the pipes.
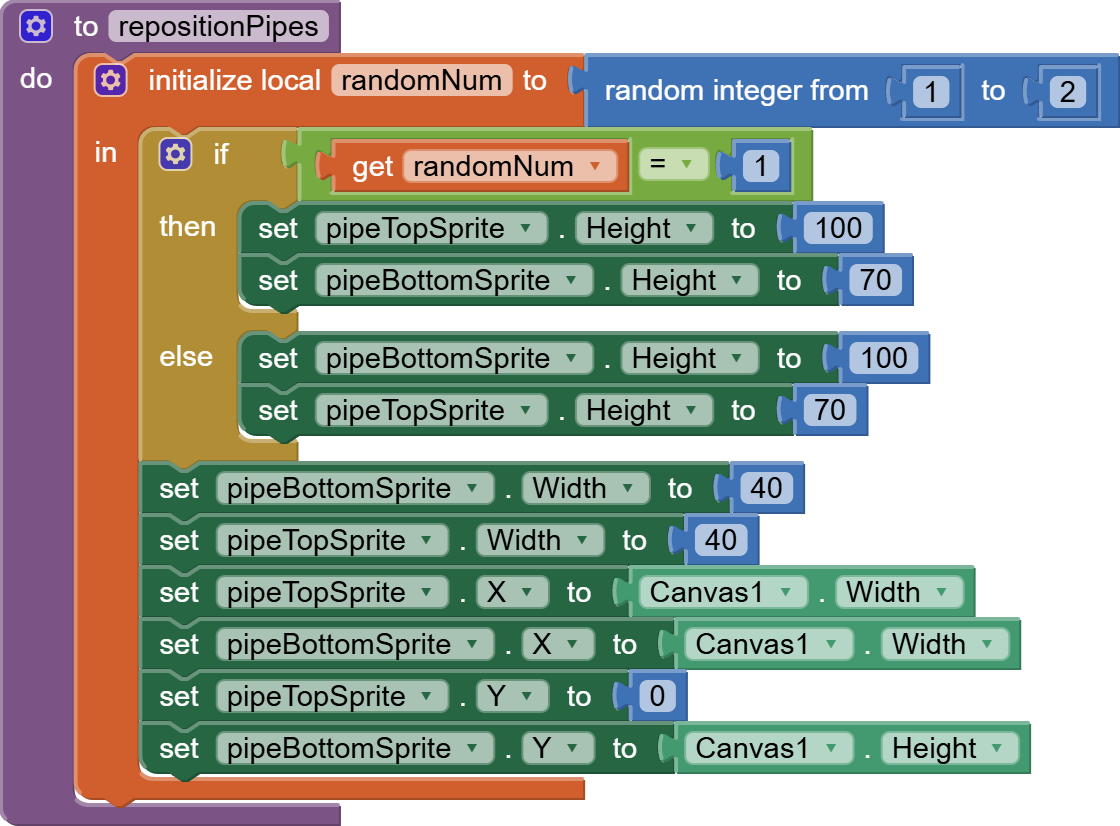
Now, lets work on our repositionPipes procedure.
Make a local variable called randomNum and set it to a random integer between 1 and 2. This means that randomNum can either be 1 or 2.
We check its value and depending on that either increase the height of the bottom pipe or the top sprite.
After if/else blocks, there is some general code that gives the correct width of 40 to both pipes and an X position on the extreme right of the screen. The Top pipe is positioned on top of the canvas whereas the bottom pipe is positioned on the bottom of the canvas.
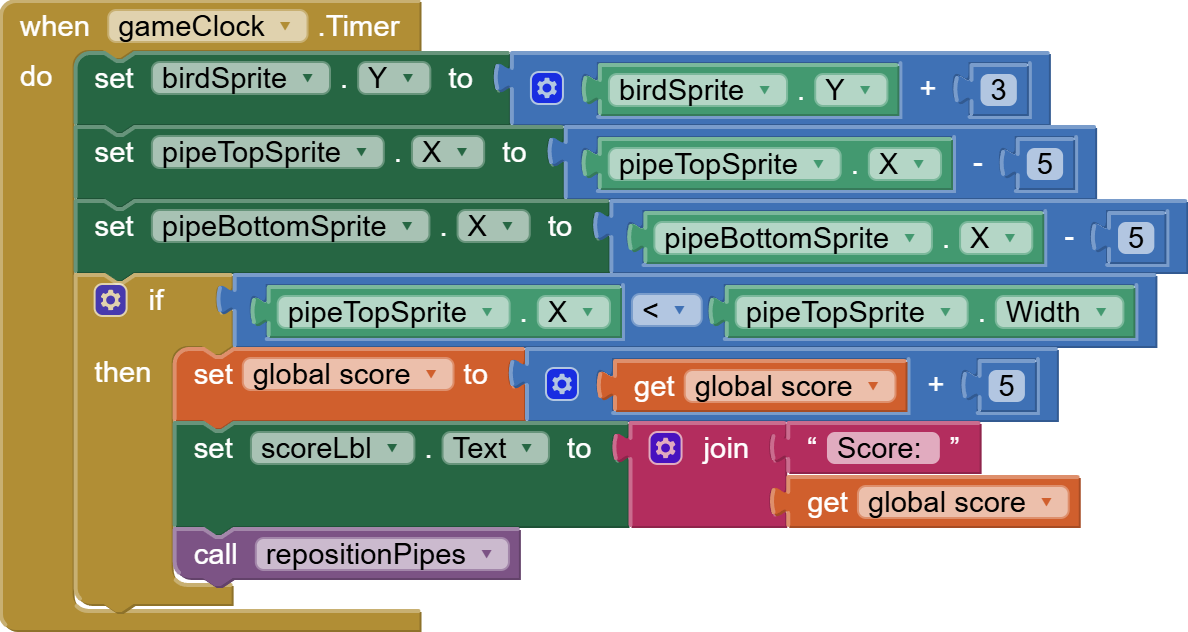
Next, we need to work on our game loop so get the gameClock event. Remember that this event is fired after every 20 milliseconds.
Here we increase the bird’s y so that it looks like it is falling because of gravity. We also make X of both pipes less so that they will start moving left. At the end, we check if one of our pipes has reached the extreme left of the screen. In this case, we increase the score by 5 (as this means that the bird was able to avoid touching the pipe and didn’t trigger game over condition). We also update the score label on the screen and call repositionPipes.
Now, lets work on a game over procedure as its code needs to be used multiple times. We set game over variable to false, disable both timers and draw game over text on the screen in the middle.
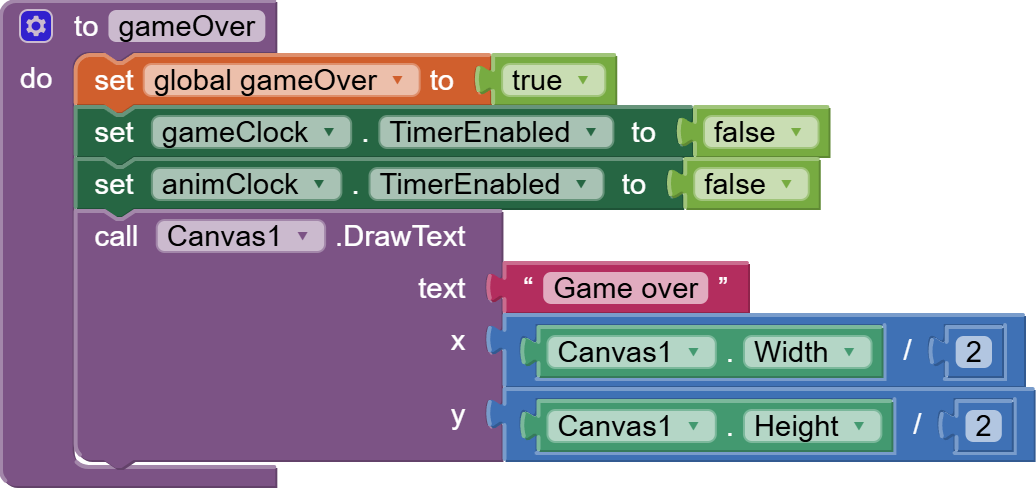
Game over procedure will be called in two conditions:
Bird collides with pipes OR Bird collides with top or bottom edges.


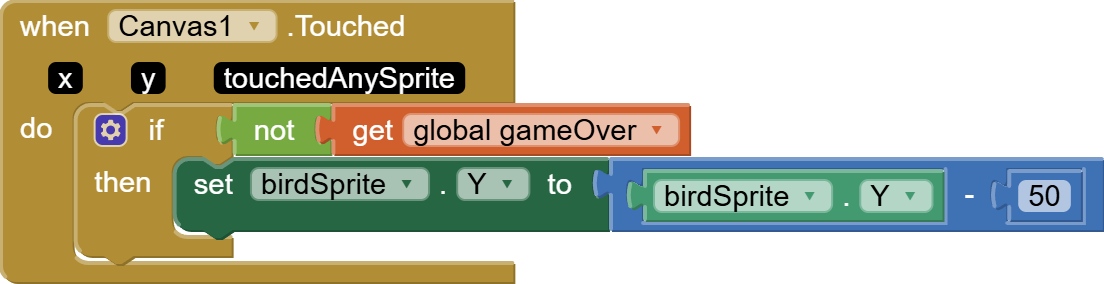
Last but not least, we have to make the bird fly upwards in case of touching the canvas but check that game isn’t over, and if it isn’t make the bird’s y less so that it goes up.
So, this is done. I hope you enjoy creating this game. You can add more pipes to the game for advanced levels and change the values of the gameClock timer interval to make the game faster or slower.
You can also have a look at the full video tutorial here:
Please like my videos and share it with your friends and family. Also, subscribe to my channel and press the bell icon so you don’t miss any of the great projects I have planned for you.
https://www.youtube.com/c/obsidiansofteducation
Please like my Facebook page and Instagram page for more educational resources and tips.
Facebook: https://www.facebook.com/ObsidianSoft/
Instagram: https://www.instagram.com/obsidiansoftapps/
Pinterest: https://www.pinterest.com/obsidiansoft/
For links to free educational apps, have a look at the educational apps page